
For live emergency information access: VicEmergency app, ABC local radio (for Ballarat – 107.9FM), or VicEmergency Hotline – 1800 226 226. In an emergency, call 000
Brown Hill FireAware Network
Prep before plan: Home Ignition Zone & Zone Zero (PART 2)
Start here if this is your first visit
This page is a reference resource for practical ember-proofing actions and fire season planning: what to do, when to do it, and why it matters for the specific housing type in Brown Hill northside. It works best once you’ve been through the anchor page first: “What you need to know when you can’t leave.” That page gives you the context for why these actions matter,and its links will bring you directly to the relevant section here.
- If you’ve arrived here directly, welcome, but we suggest starting there as well → “What you need to know when you can’t leave.”
- Already been there? Use the section links at the top of this page to find what you need.
This is Part 2 for Prep before Plan. It covers the practical, on-the-ground work: assessing your property zone by zone, the priority ember-proofing actions, seasonal maintenance, and what to do when a high fire danger day actually arrives. For the fire science and Home Ignition Zone concepts this is built on, see Prep before Plan (Part 1).
What you will find on this page:
SECTION 2
PREPARING: Ember-proofing your home – zone by zone
Step 1: Assessing the vulnerabilities of your house and yard to ember attack; why walk your house (video);
Zone Zero: the critical area;
- Protect your deck from bushfire (video);
- More detail for Mitigations that Matter – Zone Zero (video);
Zone 1: the wider yard area;
- More detail for Mitigations that Matter – Zone 1 (video);
- How to create Fire Smart landscaping (video);
- CFA information for garden landscaping;
- CFA Garden Design for Bushfire (video) – applicable for bush blocks in Brown Hill
- Plant selection key – interactive;
Zone 2, extended area
STEP 1 Vulnerabilities Assessment Checklist to download:
Step 2: Initial actions for ember-proofing and clearing Zone Zero:
- roof & gutters;
- integrated garage;
- bark mulch;
- timber boundary fencing; stop your fence from burning your house (video)
- wheelie bins
- VBA/CFA: Guide to Retrofit your Home for Better Protection from a Bushfire
STEP 2: US based IBHS Prepared Home Program checklist
Bare Bones’ Tubs & Kits (Emergency Kits)
- TUB 1: Off-Site Tub: Spokane, Washington State: Couple finds cherished keepsakes in rubble of burned home (video)
- TUB 2: Protective Gear Tub
- KIT 3: Shelter Kit
- KIT 4: Ember Kit
- KIT 5: Pocket Kit
Bare Bones Tubs Kits to download Bare Bones Tubs & Kits Checklist V2
Step 3: Actions for ember-proofing and clearing Zone Zero on a seasonal basis
STEP 3: Seasonal House & Yard Action Checklist to download
SECTION 3
A SCENARIO: High Fire Day has arrived
Forecasted day has arrived – hotter, drier with wind increasing
Scenario 1: No fire in your area
LEAVE EARLY: How do you do that?
- What the research says;
- What official guidance says;
- Why leaving is genuinely difficult for some;
- common constraints;
- plan to leave? plan it properly
Scenario 2: A fire has ignited in the Creswick Regional Park
Fire Safe Marin: What to do when a wildfire (Bushfire) is near your home… (video)
Scenario 3: You planned to leave but now you can’t
The difference between ACTIVE and PASSIVE sheltering and why it matters
- What the research says: distinction matters; why passive waiting fails; signs the house is failing;
- What active sheltering means: in practice; avoid the bathroom;
- Managing bushfire smoke entering the house: when fire is in your area; when smoke is over your house or ash starts to fall;
- Knowing when to abandon the house – two triggers:
- Your exit strategy must be decided before the event:
- Where will you exit to?
- Preparation is what makes active sheltering possible;
- Smoke that reduces visibility;
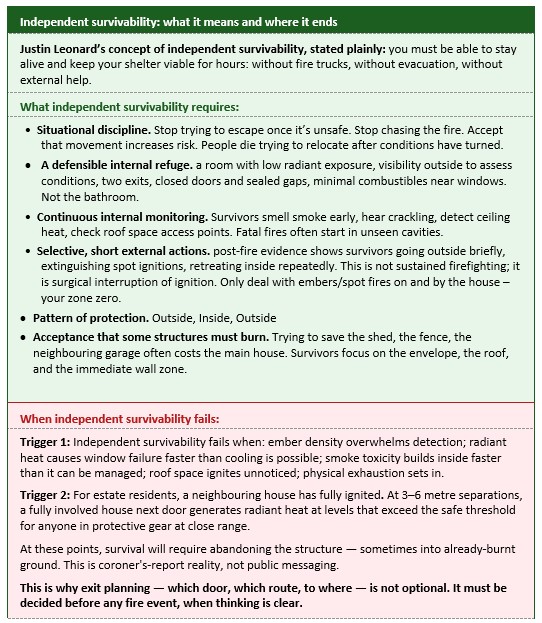
- Independent survivability: what it means and where it ends;
- After the worst appears to be over – the phase most guidance skips.
Tools and equipment for the active shelterer: why water can be unreliable; basic equipment; tips for: garden hoses, buckets of water, wet mops, rakes, hoe or shovel
Returning to where we started, Dr Kevin Tolhurst advice…
SECTION 2: PREPARING: ember-proofing your home – zone by zone
Most homes don’t ignite from a fire front. They ignite from embers, burning fragments landing in and around the structure, finding a gap, a vent, a bed of bark mulch, a timber fence touching the wall. Ember-proofing addresses this directly. Most of the work can be done once, properly, before the season. After that it is annual checks, maintenance and actions for expected fire days. The effort is front-loaded, and so is the protection.
Now that you understand the bushfire risk to you, your family and your home along with an understanding of why and how the Home Ignition Zone /Zone Zero principles can lower that risk here is a guide to step you through a process. This is not an exhaustive list – it is best for residents to use this as a starting place and do their own research for the detail depending on the characteristics of their property.
This guide is written primarily for northside estate housing however it is also as relevant for other locations in Brown Hill where there are different housing characteristics: northside Ditchfield/Benson/Hearn Rd area; blocks along Springs Rd; southside; older, pre-BAL era, or with significantly different construction. The same principles apply.
STEP 1: Assessing the vulnerabilities of your house and yard to embers
Why do this? Houses burn from the inside out therefore the best way to prevent your house from burning down is to not let the embers IN. This is the whole purpose of ember-proofing your house, your home. You cannot stop embers entering unless you know where they could enter.
Ember-proofing works in layers. Zone Zero (the 1.5m immediately around your house and any attached structures) must be completely free of combustible material, this removes the fuel that would otherwise carry fire to the structure itself. Together with sealing gaps in the structure, these two layers give your house its best chance of surviving an ember attack.
The 2mm rule: Any gap larger than 2mm is a potential ember entry point. Think of it as similar to draught-proofing: if you can see light or feel a draught around a door frame, window frame, or closed garage door, embers could get through. Also note where leaves and debris collect around the house, embers accumulate in the same spots.
Here is your Vulnerability Assessment Checklist to download:
STEP 1 Vulnerability House & Yard Assessment Checklist V2
When you look through FireSmart (FireAware) eyes, bushfire risks are clear
Source: FireSmart BC
Walk your house and yard – what to look for
Walk around your house and yard with the Assessment Checklist and note the condition of the items listed or areas and the actions that may be required. If you know your BAL rating have a list of what requirements were done for your particular rating: Has anything deteriorated, been modified, or bypassed since construction?
Is your garden a Fire Wise garden? What landscape features may need modifying?
How sound is the structural integrity of the house? what could make it vulnerable to ember entry: peeling paint on weatherboards; bricks cracked; tiles missing/cracked; combustible clutter under the house?
- External walls and foundation: Condition of walls (brick, weatherboard, fibre-cement). Sub-floor: enclosed? Combustible material stored there? Vents and weepholes — are they screened?
- Windows and doors: Glazing type; frame material and condition; louvred windows (high-risk); awnings: material, condition, retractable? Any shutters?
- Roof, gutters, facias and eaves: Debris in gutters; condition of tiles or sheeting; ridge capping; any gaps in eave lining. Worth checking inside the ceiling space for sarking condition.
- Items on the roof: Evaporative cooler’s cellulose pads are highly combustible. Solar panels, skylights, chimney, aerials, plumbing penetrations, each may have gaps where they penetrate the roofing material, and each can accumulate debris. Skylight material are they fibreglass-reinforced or polycarbonate? Fibreglass is highly ignitable and can carry fire into the roof cavity; polycarbonate melts/droops but doesn’t burn in situ.
- Attached structures: Verandah, pergola, deck, carport, shed, split-system unit. Note what they’re made of and what’s stored there. Pay particular attention to any fencing between the boundary fence and the house wall which is a direct fire pathway to the structure.
Protect your Deck from Wildfire (Bushfire)
- Shade cloth and shade sails: treat as combustible. Can they be removed when needed?
- Zone Zero extends 1.5m from all attached structures, not just the house wall itself.
- Garage (if sharing the same roofline): This is the highest-probability ignition point in estate housing, an ember ignition in the garage can enter the roof cavity directly. Check the bottom seal of the garage door (any light visible underneath?); gaps around the perimeter when closed; the internal door to the house.
Zone Zero – 0 to 1.5m around the house
Clearing this 1.5 metre space around your house of anything that could burn reduces the risk of: wind-driven embers igniting things near your house; reducing radiant heat damaging or igniting your walls; windows cracking under heat; embers finding weak points to get inside.
The home and the first 0–1.5m around the structure, has the greatest impact on your risk and should be your starting point for enhancing wildfire protection. This area is critical due to the primary source of how homes ignite, embers and small surface flames. The structure needs to be kept in good repair (ember-proofed); The 0-1.5m space around the structure and attachments such as decks should also be free of things that can burn.
What is currently in this zone? Note condition, whether it’s combustible, and whether it can be moved. Ground cover (mulch, lawn, gravel, paving); plants and shrubs (any near windows); water tanks; wheelie bins; BBQ; gas bottles; air con units; firewood; outdoor furniture; doormats; anything stored against the walls.
More detail for mitigations that matter – Zone Zero (video)
Video transcript for downloading (add to your planning folder): IBHS Mitigations That Matter Zone Zero
Intermediate Zone 1 (1.5m to 10 m): the wider yard area which will likely overlap with your neighbours Zone 1
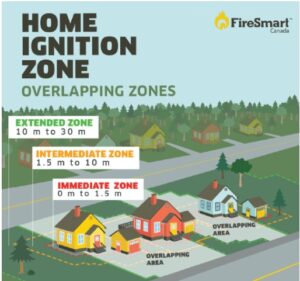 While Zone Zero focuses on eliminating combustible material, this area is all about spacing and maintenance, making sure there isn’t continuous vegetation all around the home. It uses landscaping (creating clumps or little islands with plants) and breaks (areas of noncombustible materials such as dirt, cement, or rock) to help influence and decrease fire behavior.
What is currently in this zone?
Boundary fencing: Timber or Colorbond (including timber base rail)? Does fencing extend from boundary to the house? Cubby house, trampoline, play equipment: how far away are they from the house? Caravan, boat, trailer – can these be stored off site during peak fire weather? Has a garden shed have the same 1.5m combustible free zone around it? What is the approximate distance between your house and neighbours’ house at each side, and what’s in between them?
Boundary hedge: A continuous hedge along a boundary fence is a connective fuel path, fire runs its length like a candle wick, especially where it meets a timber fence. Break it into clumps with gaps every few metres, clear dead material and mulch from underneath, and keep a gap between the hedge and the fence or house wall (1.5m) rather than letting it grow hard against either. Needs to be clipped and kept to a maximum height of 1m.
Landscaping tips: Keep adequate separation between low shrubs and mature trees. Low, fleshy groundcovers can be planted under trees (but not shrubs, to avoid ladder fuel). There needs to be under-pruning of any low tree branches and regular maintenance of hedges. Leave space between plant groupings with non-combustible surface areas like stone, gravel paths and other non-combustible, permeable materials to slow down the path of a fire and to allow easy access for maintenance.
Questions? Is any hedge continual or broken into clumps with gaps? Is there a hedge-to-fence/wall gap? Is there dead material inside any hedge or shrubs? Is there ground litter under hedge? Is there shrub and tree separations? Are garden beds separated by lawn/gravel or paving?
More detail for mitigations that matter – Intermediate Zone 1 (video)
CFA information for garden landscaping ideas – the same concepts but remember to apply the HIZ Zone Zero & Zone 1 distances
CFA Plant Selection Key helps you choose plants for a garden in a high bushfire risk area. Answer questions to get:
- an overall flammability rating
- a firewise rating
- maintenance advice
- advice about whether the plant is appropriate for a garden in a high bushfire risk area
Access here: CFA Plant Selection Key Interactive web page:
Remember:
- There are no ‘fireproof’ plants and all plants will burn in extreme fire-weather conditions
- The moisture content of leaves is a major factor affecting how easily a plant will burn
- The location and arrangement of plants has a significant effect on reducing bushfire risk in your garden
- During summer as soil dries out, the moisture content of plants will decrease and their flammability will increase
29 October 2021: CFA Garden Design for Bushfire: Learn about landscaping and design choices you can make to reduce the bushfire risk to your home on rural or bush blocks. Applicable to bush blocks in Brown Hill
CFA Suburban Garden – Landscaping for Bushfire: Garden Design & Plant Selection
CFA Landscaping for Bushfire – Garden Design and Plant Selection
Extended Zone 2: 10 – 30 metres
If your property boundary is greater than 10 metres – this is called the Extended Zone 2. This area allows for a little more flexibility when it comes to management as the goal isn’t to eliminate fire, but rather to interrupt fire’s path and keep flames smaller and on the ground, reducing intensity
If your property extends into this zone, a few important steps you can take concerning mature trees, include:
- Selectively remove evergreen trees to create at least 3 metres of horizontal space between the single or grouped tree crowns.
- Remove all branches to a height of 2 metres from the ground.
- Regularly clean up accumulations of fallen branches, dry grass, and needles to eliminate potential surface fuels.
Source: NFPA: What Is the Home Ignition Zone?
After your walk-around
It will possibly look like a daunting list. That’s normal — this is the first time most people have looked at their house in this way. Use it as your baseline for developing your to-do action list and review each year. File the completed checklist in your Prep and Planning folder. Once this initial assessment has been done, each year’s review will be quicker and simpler.
When you’re ready, the next step is to learn how to ember-proof your house and focus on the actions that make the most sense for your location and circumstances. Small steps before the fire season are better than a perfect plan that never gets done.
Justin Leonard (2025 BRI webinar): “If you haven’t got your house and its immediate surroundings in complete order, all the rest of the work in the broader landscape is dramatically diminished in relevance and usefulness.”
Step 2: Understanding what is ember-proofing
There a five critical components that researcher, Justin Leonard highlights as being priorities when ember-proofing, concentrate on these areas first:
1. Roof and gutters
Embers collect where they find fuel: in gutters full of debris, around ridge capping gaps, in unprotected vents, evaporative cooler units, solar panels and in the roof space if they find a way in. A fire that starts unseen in the roof space is very difficult to detect early.
What you can do yourself: Clean gutters thoroughly before each fire season and check again after autumn leaf fall. This is the single highest-value roof action most residents can take. If you use downpipe plugs to fill gutters with water on a high danger day, clean gutters are what makes that work. Professionally installed ember guard for gutters is the other option. Everything else at roof level is a tradie job.
Evaporative Air Conditioner (cooler) filter pads can ignite if dry: cellulose filter pads are combustible; fit a non-combustible ember screen before fire season.
Do you have a ducted air conditioning system with a fresh air intake? You need to check your manual and contact the manufacturer/installer and obtain their advice about how such a system works in a bushfire scenario and how to ember-proof it.
What needs a tradie: Before fire season, ask a roofer to check and address: ridge capping gaps, air cons and solar panels, and roof vents (need 2mm steel, bronze or aluminium mesh covers), cracked or displaced tiles, and the junction where the roof meets the wall. When booking, ask specifically: “Can you check for ember entry points?” — not all roofers think in these terms automatically.
A note on sarking: Newer houses built in Bushfire Prone Areas should have fire-rated sarking under the tiles as required by current building standards. Older houses without sarking would require full which retrofit is costly; focus on the concentrated entry points above.
2. An integrated garage (under the same roofline as the house): Is the highest-risk configuration
An ember ignition inside the garage doesn’t just threaten the garage — it has direct access to the shared roof cavity and from there to the whole house structure. This is the dominant type in northside estate housing. The internal door between garage and house is the last barrier — it must self-close and be as close to fire-door standard as possible.
The priority modification is sealing all of the door’s perimeter: The bottom, sides and top of the roller door against ember entry. The bottom brush seal is the most accessible first modification. Gaps in the perimeter of the garage door allows ember entry to the interior which then provides the fuel to turn a small ignition into a serious fire. There should not be any combustible material within, at least, a metre of the door opening. When investigating brush seals look for brush strip flammability index 1 when tested to AS1530.2 and BAL statement compliance in accordance with AS 3959.
Detached garage or shed are still a significant consequential fire source: It will burn hard and deliver radiant heat and embers to the main house. But the fire doesn’t enter the house envelope directly. The threat is house-to-house style radiant heat and ember output from the burning structure, not immediate internal roof cavity ignition. Ember-proof the same, but if not lined also include ember-proofing wall roofing join with wire mesh (<2mm) and any other gaps.
3. Bark mulch
Leonard’s verdict is unambiguous: “There’s nothing good about bark mulch near your house.”
His field case study, a BAL-29 house damaged not by the fire front but by ember-ignited bark mulch in an adjacent garden bed, shows this is not theoretical. The mulch burned hot enough to melt window blinds through toughened glass. Remove it within 1.5m of the house with gravel, stone or other inorganic material.
For more details: Defensible Space Landscaping Mulch 2026; Fire Smart Yards – a visual guide for landscapers
4. Timber boundary fencing:
Timber fencing can carry fire directly along its length to the house wall – it is a fuel pathway, not just a boundary. Leonard is direct: “any combustible (timber) fence within a few metres of the house wall is too close, even hardwood. At that distance a burning fence delivers sustained heat directly to the structure.”
The fence-to-house-wall junction is the critical ignition point in post-fire survey after survey. The highest-priority modification is the internal divider fence, the section running from the boundary fence to the house wall, separating front and back yards. Replacing this section with Colorbond, or another metal substitute, removes the direct combustible connection to the structure. Full boundary fence replacement may not be practical; this section is what matters most. NOTE: Colorbond fencing usually comes installed with a timber plank between panels – this area needs to be cleared of anything that can burn.
Stop your fence from burning your house
Leonard names wheelie bins specifically as consequential fire sources that residents don’t register as significant hazards — but they burn prolifically. One bin stored against a house wall, under a window, or at a fence-to-wall junction are sufficient on their own to cause house ignition. (For awareness and a fire day action)
In Ballarat we have four per property! A solution is a fire-day action: on any day forecast Extreme or Catastrophic, move all bins away from the house – possibly: to the nature strip, the centre of the driveway, or some in the garage or garden shed, before conditions peak. This is a five-minute action that removes a significant fuel load from the house perimeter. BUT be aware that moving your wheelie bin risk away from the house may increase the risk to your neighbours. A conversation to be had before the day.
Official guidance: what ember-proofing looks like in practice
The VBA and CFA Retrofit Guide translates the above priorities into a formally documented, costed framework — useful for understanding what each modification involves and for conversations with tradies.
A full breakdown of costs and options for ember-proofing, can be found in the VBA “A Guide to Retrofit your Home for Better Protection from a Bushfire” including the table below.
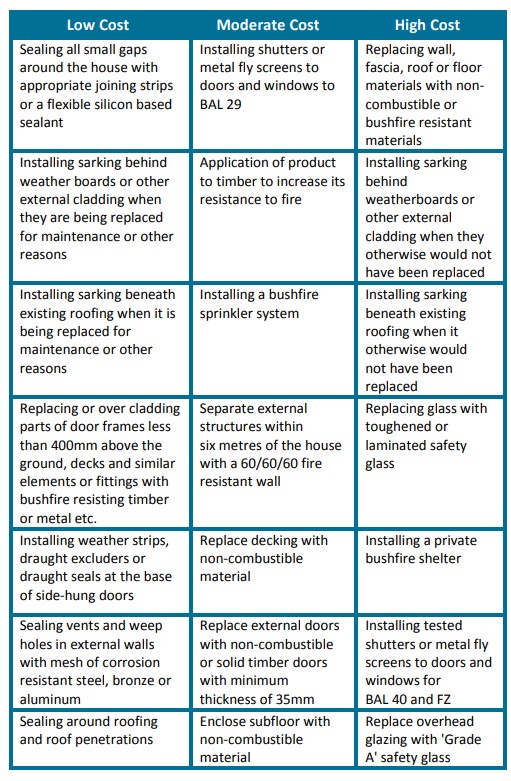 The VBA and Country Fire Authority (CFA) have joined together to provide practical advice to those who wish to upgrade their existing homes to be better protected from bushfires.
A range of options exist and this guide is divided into two parts: retrofit for generic ember protection and retrofit protection for various Bushfire Attack Levels (BAL), based upon the Standard.
Although this guide is designed to improve the performance of homes when subjected to bushfire attack there can be no guarantee that a building will survive a bushfire event. This is substantially due to the unpredictable nature and behaviour of fire and the difficulties associated with extreme weather conditions.
While this guide identifies available construction protection methods as per AS 3959, it should be clearly understood that such building enhancements are complementary to good site preparation and vegetation management in the context of your bushfire survival plan.
Reducing the risk from bushfire comprises a number of processes and tasks:
- Assessing and managing site vegetation
- Defendable space assessment and maintenance
The guide also provides a cost and implementation guide for retrofitting existing homes for bushfire protection measures will vary significantly depending on factors, such as:
- The existing construction methods and materials used in the building
- The age of the building
- Access around the building and the height of the building above surrounding ground
- Location and access to suitable tradespersons and material suppliers so that competitive pricing can be obtained
- Whether any heritage or other controls apply to the building.
Owners are also cautioned that existing buildings may contain materials made from asbestos or have painted surfaces that contain lead. These materials should be handled in accordance with appropriate guidelines. Depending on the construction of your home, some retrofitting measures will be more or less expensive than others.”
Key Hardening Actions (Ember Proofing) The guides emphasise that “ember-proofing” is the most crucial step: [1, 2]
- Seal Gaps: Use silicone sealant, weather strips, or draught excluders on doors and windows to seal gaps larger than 3mm.
- Mesh Screens: Install non-combustible metal mesh (steel or bronze) screens on all windows, doors, vents, and weep holes.
- Roof Protection: Clear leaves from gutters regularly and consider installing metal gutter guards. Check for gaps in the roofline/tiles and seal them.
- Enclose Subfloors: Use non-combustible materials to enclose the subfloor of your home to prevent debris from catching fire.
- Evaporative Coolers: Protect evaporative air conditioners with a metal mesh screen. [1, 2, 3, 4, 5]
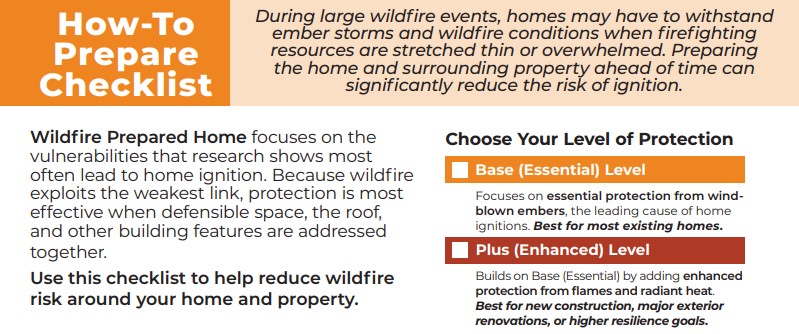
STEP 2 US based IBHS Wildfire Prepared Home Program & checklist
The US based Insurance Institute for Business & Home Safety (IBHS) created the Wildfire Prepared Home program. This is a science-based designation program from IBHS that helps homeowners reduce wildfire risk through proven mitigation actions and third-party verification. Most homes ignite from wind-blown embers, not the large wall of flames. These embers can travel more than a mile ahead of a wildfire and collect in vulnerable areas around structures, such as vents, gutters, mulch beds, against fences, against the foundation, and above decks—where they can start spot fires. During large wildfire events, homes may have to withstand ember storms and wildfire conditions when firefighting resources are stretched thin or overwhelmed. Preparing the home and surrounding property ahead of time can significantly reduce the risk of ignition.
IBHS offer this How to prepare checklist to help reduce wildfire risk around the home and property. Add this to your planning folder (You will need to convert distances into metric such as: HIZ zones: Zone Zero 0 to 1.5m; Intermediate Zone 1 – 1.5 to 10m)
Bare Bones’ Tubs & Kits (Emergency Kits)
Ask any bushfire survivor what they left with, and the answer is almost always the same: nothing but the clothes they stand in, or stuff that means nothing to them. Not because they didn’t care enough to plan, but because there is no plan in the moment itself. Adrenaline strips out the ability to think a list through. People run from room to room and grab whatever their eye lands on, then stand in the driveway holding it and wondering why.
The way around this isn’t a better list to remember under pressure. It’s removing the moment of choosing altogether. Everything that matters is decided and packed at the start of the season, while you’re calm, not during a heatwave, not with smoke on the horizon. From that point on, there’s nothing left to think about.
This list is deliberately the bare minimum, stripped back, not a generic disaster-preparedness list built for floods, cyclones or days of isolation. If you want the fuller, standard emergency kit checklists (food supplies, multi-day water), CFA, CFS and Red Cross all publish these, and they’re worth a look, but for most Brown Hill residents, minutes from the centre of Ballarat, that’s more than the situation may call for. What follows is what matters, and add to the list as you apply it to your own households situation.
There are 5 tubs/kits:
TUB 1: Off-Site Tub — packed at the start of the season, delivered off-site when a heatwave is forecast
This is both the “memory” tub and the “official docs” tub. This one tub can be a step to putting a life back together. At the start of the season choose just a few precious items that hold special memories: jewellery with meaning, a handwritten letter, a small memento, a child’s artwork, something that belonged to someone no longer here. Include your photos on a USB stick, or portable hard drive.
They are tokens, not everything you cherish. Packing this tub means acknowledging, in advance, that you might come home to nothing else. That’s not pessimism, it’s the same emotional acceptance Dr Rob Gordon’s work points to: people who have genuinely accepted the house might not survive make clearer decisions than those still trying to protect the idea that it will.
4 August 2026: Spokane, Washington State: Couple finds cherished keepsakes in rubble of burned home:
 Jim and Kerry Zimmer lost their Spokane home when it burned, as the wildfire tore through their neighborhood Saturday. On Monday, the couple returned to see the damage and take in what was left of the place they called home. As they sifted through the rubble, they found a few heartfelt keepsakes still recognizable among the destruction. The couple spoke with CNN’s Julia Vargas Jones about those items and the memories attached to the home, including one of their most recent and special moments there: hosting their child’s wedding just this past June.
To access video click on this CNN image
Added to this tub are your “official docs”, scanned and added to a USB stick, such as: copies of driver’s licence/photo ID; bank details; passport; will; insurance papers; rates & water rates details; medical prescriptions; medical records; house and contents – photos of every room; house plans; property titles; etc. Throw in a spare phone charger as well. Include hard copies if you wish.
Pack it once, at the beginning of the season, then hand it to a trusted friend or family member outside the risk area whenever a run of hot, dry, windy days are coming. Pick it up once the risk has passed. Repeat as many times as the season requires, keep the tub small enough that it’s no imposition on whoever is minding it for you. Then each season update the tub and repeat. If you are new to Brown Hill and friends and family live further away, maybe consider a small storage unit. Both “Secure It Self Storage” and “Storage King” in Wendouree offer a 1m X 1m “locker” arrangement.
TUB 2: Protective Gear Tub — packed at the start of the season, stays home, worn on the day
Always packed, always in the same place. Check it early each season, to see if it still fits. If it has been stored in the garage or shed move it inside to a handy cupboard somewhere convenient when a heatwave is forecast. Put it on when there’s fire in the area, or when you’re about to leave. Review the “What is protective clothing” section and ensure all items are serviceable e.g. new masks obtained. All members of the household need to have their own kit of protective clothing. Also ensure that any woollen blankets are kept in good order and accessible.
KIT 3: Shelter Kit – sourced at the start of the season, stays home, accessed when you can’t leave
These items are for helping you to get through the hours you’re sheltering in place, especially if power and water fail. The list is kept modest, deliberately — this is for hours, not days, this close to Ballarat.
- Water and food that needs no preparation guards against dehydration and a blood-sugar crash (follow the guidelines in this link), both of which can cloud judgement exactly when clear thinking matters most. Remember to drink water/fruit juice regularly to avoid dehydration. Drinking and eating — do it on a schedule, not on feeling.
- Drink approximately 250ml (one cup) every 15–20 minutes while active, set a reminder if needed
- Do not drink more than approximately 1.5 litres per hour
- After the first hour, plain water alone is not enough, include something with salt or sugar: fruit juice, a piece of fruit, crackers, a sports drink
- Eat something small regularly, blood sugar drops under sustained adrenaline and you won’t notice until your thinking is already impaired
- Rest briefly every 30 minutes, “Do this on a schedule, not when you feel like it” (Gordon)
- Don’t rely on tap water as pressure can be severely compromised. Ensure you have filled all available containers on a high fire day: bath, laundry troughs, buckets – for both drinking water and extinguishing small fires inside (using a wet cotton mop).
- Non-perishable food: such as baked beans, tinned tuna or salmon, canned fruits (ring-pull or ensure you have a manual can opener); protein or energy bars, dried fruit and nuts; crackers and spreads. It might pay to check the expiration dates of your food each year. Fruit juice and juicy fruits can assist with dehydration. (After the first hour, plain water alone is not enough — include something with salt or sugar: fruit juice, a piece of fruit, crackers, a sports drink)
- Ensure all phones and rechargable items are fully charged – morning and evening; spare batteries, especially for the radio; consider a portable charger.
- A first aid kit to cover the basics. In an emergency, a well-stocked first aid kit can mean the difference between a manageable situation and a crisis. Ensure that your first aid kit is checked and restocked at the beginning of each season.Your kit should contain essentials such as bandages, dressings, saline solution for eye irrigation, and burn dressings.
- A wool blanket or thermal blanket helps to shield against radiant heat and embers (if you need to leave an untenable house) , while P2 face masks with valves, reduce exposure to smoke. Goggles to protect eyes, make sure they fit properly and manage any fogging. Pain relief medication and a first aid manual are also essential.
- If you have asthma or another respiratory condition, keep a spare inhaler and necessary medications in your first aid kit. Access to pharmacies or medical care may be limited in a bushfire, so having these essentials on hand is lifesaving.
- For more details access this link: First Aid Tips: What to do in a bushfire: Download and print the following St John’s Fact Sheets and keep with your first aid kit: Smoke & embers in your eyes; Asthma emergency; Heat-induced illness;
- Lighting when the power fails: A battery radio (ABC Ballarat 107.9FM) keeps you informed without power. A camping lantern lights the room hands-free if the power’s out; a head torch does the same for checking the roof space or patrolling outside. Assorted house torches – either battery or wind-up.
KIT 4: Ember Kit – assembled at the start of the season, stays home
Go through the “Tools and Equipment for Active Shelterers” thoroughly and gather together the basic equipment suggested: garden hose/s; buckets (metal is best) and anything else that will hold water; cotton mops; rakes, hoe or shovels; water sprayers; ladders, downpipe or gutter plugs. For use inside the house, to help stop smoke and embers getting in through gaps, collect old towels or blankets (wool or cotton) that can be placed around window and door edges.
Remember: Your role is NOT to fight the bushfire it is to only deal with embers/spot fires on and by the house – your zone zero. Your pattern of protection. Outside; Inside; Outside; with selective, short external actions. Post-fire evidence shows survivors going outside briefly, extinguishing spot ignitions, retreating inside repeatedly. This is not sustained firefighting; it is surgical interruption of ignition.
KIT 5: The Pocket Kit — what you actually carry out
By the time you reach this point, the tub has already gone, the gear is already on. You have already been using the Shelter Kit. If you can no longer stay in the house and need to exit, what’s left fits in the pockets of your protective clothing, plus two items you’ll carry in hand: phone and charger; car key/house keys; wallet and cash; glasses; watch; water bottle; woollen blanket; medications if required for the day. Also when leaving remember your mask, goggles, gloves and hat.
Bare Bones Tubs & Kits Checklist to download
Bare Bones Tubs & Kits Checklist V2
Step 3: Action timeline for ember-proofing and clearing Zone Zero/Zone One on a seasonal basis
Keeping your home and property well prepared throughout the year is essential to ensure your house has the best chance of surviving a bushfire event.
Ember-proofing your home and maintaining Zone Zero, as best as you can, each fire season is the most cost-effective insurance you will ever take out. Unlike your home and contents policy, you pay this one with your time. And unlike that policy, it may actually help your house to survive.
If you leave your prepared empty house is also safer for the neighbours who cannot leave. An unprepared empty house is not just a victim of fire — it is a source of it.
Here is your Seasonal Action Checklist to download:
STEP 3 Seasonal House & Yard Action Checklist V2
In winter, take advantage of the cooler weather to clean up your property and ember proof your home:
- Review your House and Yard Ember Vulnerability Assessment Checklist: Another walk- around will jog the memory and highlight what still needs to be done.
- Update the checklist accordingly. List ember-proofing actions that could still be done before this bushfire season.
- Dispose of unnecessary clutter. Even if not combustible themselves they can still collect debris, which can burn, and trap embers.
- Replace bark mulch within 1.5m of house with gravel or stone or other non-combustible material
- Remove accumulated dead vegetation from around your home; remove any tree limbs overhanging the roof and clear around the base of trees; remove any dead material within shrubs and garden beds; ensure that all material collected is disposed of correctly.
- Trim boundary hedges, remove dead wood and ensure litter is removed from base. If hedge is beside timber fence – it needs to be removed. If hedge is continual – remove sections so hedge is in clumps with breaks.
- If your property extends further than 10m check mature trees for appropriate clearances.
- Remove any tree limbs overhanging the roof.
- Clear the base of boundary fencing of combustible material especially if it is a timber fence. Even a colorbond fence which has a timber barge rails that can burn.
- Prune back vegetation that is overhanging the fence from neighbour’s properties.
- Take advantage of CoB free green waste vouchers for disposing of green waste.
In spring, get ready for the impending Fire Danger Season:
- All your pre-season ember-proofing actions should have now been completed or nearly so.
- Declutter where things have accumulated in Zone Zero and Zone 1.
- Keep grass short, mow regularly and keep well-watered.
- Ensure a cleared zone around any permanent structure within your yard e.g. garden sheds, large play equipment
- Ensure that any winter wood piles are diminished & moved away from house, but be aware that by moving it, it does not become a hazard to your neighbours.
- Check and clear combustibles from inside garage door perimeter.
- Check and maintain cleared space around trees, hedges and garden beds.
- Clean gutters and check downpipe plugs and have a test run of filling gutters (how long does it take?) Ensure you keep the plugs in an easily accessible location.
- If you have shade cloth/sails attached to your house, check their condition. If old and deteriorating possibly a good time to take down and discard. Think carefully about what to replace them with, if at all. All such material IS combustible. If permanently attached that area would need extra monitoring for ember ignition.
- If you have a water tank for domestic purposes – ensure it is full for the fire season and it has a tap at bucket height.
- Prepare / check your Bare Bones Tubs & Kits: Off-Site Tub; Protective Gear Tub; Shelter Kit; Ember Kit & Pocket Kit.
- Review, update and practise your written Bushfire Survival Plan and back-up plan.
During summer, maintain your preparedness through the Fire Danger Season:
- Continue maintaining your defensible Zone Zero and Zone 1 around your home, around sheds and detached garage.
- Maintain cleared space around base of trees, hedges and shrubs.
- Keep clutter to a minimum on decks.
- Regularly check gutters for leaves and debris build up especially if you have mature trees close by.
- Ensure you have a portable battery-powered radio and spare batteries to listen to bushfire warnings.
- Check your hose/s and water tap fittings. Can your hoses reach all around your house?
- Practise your Bushfire Survival Plan with your family.
- Monitor the weather and Fire Danger Ratings via VicEmergency app, ABC local radio.
Immediate Heatwave Preparation (1–3 Days Before)
When there is a forecast of heatwave days approaching, all residents of Brown Hill should treat this as a major alert. No one should be “surprised ” when a bushfire event occurs under these circumstances. Remember, Dr Kevin Tolhurst’s risk assessments state clearly that ember attack is the primary expected event when a fire has ignited in the area (Creswick Regional Park).
With limited distance between housing, your preparation must focus on reducing consumable materials to a minimum, within your control in Zone Zero and Zone 1 out to your boundary. You need to talk to your neighbours when you share an overlapping zone, well before this time.
If you have followed the above actions for preparation, you are in a good place when heatwave weather arrives. This is then tidy up time, monitoring the weather and fire ratings. Use this time as a practice. If nothing eventuates then there is nothing lost, but a tidy house and yard gained.
Ember-proofing the house: Actions for ember-proofing should have all been completed by now. If they haven’t pay extra attention to any vulnerable areas not yet ember-proofed and minimise any combustible material near these areas.
Clear all combustibles from Zone Zero, including door mats; garden furniture, children’s toys, bikes, etc. b-b-ques, wheelie bins; Including inside garage door perimeter. Remove any temporary shade cloth and store safely. Either move combustibles away from the house, or put them in the house.
Ensure hoses are connected and can reach around the entire house. If Extreme or Catastrophic days are forecast, there is no harm in filling gutters before the day. Have buckets also handy ready to fill and distribute around the house.
If you and your family decide to leave the day before when a high fire day is forecast, ensure you leave your home as well prepared as possible (as above). In the event of a bushfire event such preparation will lower the risk of it becoming a fuel source to its neighbours and the best chance your house will still be there on your return. Let your friends, family and neighbours know where you intend to go and swap contact numbers. Revisit the section: LEAVE EARLY: But how do you do that?
SECTION 3: A SCENARIO: High Fire Day has arrived…
Scenario context
- You (singular or household) have ember-proofed your house, the best you can;
- You know that the purpose of Zone Zero is for it to be free of anything that will burn and is now clear;
- You know the vulnerable places where embers can collect;
- You know that if a fire impacts your northside estate ember attack will be your main threat;
- You know that if neighbouring houses start to burn it could create the domino effect of a town fire;
- You have written and printed, your Plan A and back-up Plan B – they are in your folder and accessible;
- You have practiced, to the best of your capacity and circumstances: physically, mentally and emotionally to embed the plans and the decisions made that are your foundation to respond to a fire event;
- You have collaborated with your neighbours – individually and collectively;
- Your Off-Site Tub has already been delivered safely outside the risk area; your Protective Gear Tub is checked and accessible; your Shelter Kit has been sourced and is close at hand; your Ember Kit has been assembled; your Pocket Kit is on your person or on the kitchen bench.
- You know the best way to exit your house and property and it is clear of obstacles;
- You have already timed how long it takes you to pack the car and leave
You feel ready… BUT you also know, as all survivors have said so, your experience of a bushfire event will take you by surprise and be unexpected – always be ready to pivot.
Forecasted day has arrived – hotter, drier and increasing wind…
Scenario 1: No fires are in your area
- You stay alert – keep up-to-date with latest information: Vic Emergency updates, the weather, ABC local radio;
- You check-in with your neighbours – assist where you can;
- You check the gutters and clear any debris that might have accumulated, fill gutters or top up if previously filled;
- You have laid out your protective clothing ready to put on if things escalate;
- Again check Zone Zero and the rest of your yard – you might have missed something;
- Your car has a full tank, and facing the street.
You are prepared and ready to leave at a moments notice
LEAVE EARLY: But how do you do that?
What the research says
Dr Danielle Clode: Successfully leaving is not as easy as people think. Making sure you have what you need, that you’re ready early enough, that you’re actually making that decision safely, it can be derailed by any number of things: family commitments on the day, medical appointments, pets, a visitor arriving. All sorts of things can interfere and change plans. Staying is not an easy decision either. The truth is that leaving early is genuinely hard. You really need to think through how prepared you are to do it, and to practise it…
A common variation of “stay and defend” is the ‘wait and see what happens’ strategy, sometimes described as ‘stay and defend until it gets too dangerous, then leave.‘ This approach is widespread, even among people who consider themselves prepared. A Canberra resident described this pattern in 2003: ‘I thinned out trees and chopped down the ones close to the house. I cleared a lot of ground cover and vegetation, cleared the roof regularly and had hoses on various taps around the house. We figured we’d fight a fire until we couldn’t do any more, then we’d clear out.’ This leaves you in the dangerous position of possibly not being able to leave when you finally decide you should. That is not a plan.
Dr Rob Gordon: The leaving strategy really requires you to leave before the fire starts, or at the first indication, before you are under threat. The most dangerous place to be is on the road during a fire. Having predetermined triggers, worked out calmly and carefully with all the information available, means your decision does not depend on how you interpret the situation on the day.
Dr Danielle Clode: Scenarios are really important, working through the “what-ifs.” Simply asking yourself, “What if there is a fire? What are we going to do?” is a start. The problem is that if you don’t recognise the risk in the first place, you won’t do the planning. And that’s the hard part, getting people to accept that the risk is real. Once they do, the planning follows naturally. Source: BRI Webinars
What official guidance says
CFA advises to leave early, well before a fire starts, is the safest option to protect yourself and your family. It means leaving the area before you can see flames, smell smoke, or when your designated trigger is reached. Leaving late means you risk being trapped, panicking, or being on the road when conditions are at their most dangerous.
CFA advises: Pre-arranged destinations: Plan to stay with family or friends located in a low-risk, urbanised area. Public gathering places: Consider shopping complexes, major regional centers, or community buildings like libraries. Fore more CFA information access here.
For those who can do this. and for whom it is realistic across multiple Extreme fire danger days per season, this is the right plan.
Why leaving is genuinely difficult for some households
Research into why householders remain during bushfires, including a 2024 University of Newcastle study of 2019–20 Black Summer survivors, identified 36 distinct factors across nine categories. Finance, road access, shelter availability, health, and pets were all documented as real constraints, not character failings.
Common constraints in northside estate households can include:
- No nearby family or friends with space to accommodate the household, particularly at short notice and repeatedly across a season.
- Casual or shift work that cannot be abandoned multiple times per summer without financial consequence.
- Children in school or childcare with no simple mechanism for mid-week early departure.
- One vehicle for multiple adults, with no realistic option to depart before partners or other household members finish work.
- Pets — particularly dogs — that cannot be left, and for which most emergency accommodation and many family households have no space.
- Elderly or mobility-limited household members who require time, assistance, and pre-arranged accommodation suitable to their needs.
- Cost of motel or alternative accommodation, particularly across 3–5 Extreme fire danger days per season when no fire has started and returning home the same evening feels unnecessary.
None of these is unusual. Together they describe a large proportion of northside household circumstances. The research confirms what common sense suggests: for these households, ‘leave early’ is not an easy option for every qualifying day.
As an example, here is a checklist for just ONE aspect of a plan to leave: “Checklist Household Not Together“. It covers: WHO makes the call (the decision maker); IF children are at school; IF a household member is at work or away; IF someone is home alone (elderly, mobility-limited, ot unwell). This is but one aspect that requires making a decision on at the beginning of the season. However, Unlike a constant routine, people’s day-to-day lives are shaped by shifting schedules, unexpected events, and evolving needs. This then adds to the complexity of keeping this simple list up-to-date.
The biggest questions: “Where do we go?” and “How do we get there?” are often the hardest to answer and there is no one “Leave Early” template that will suit all households. Each household needs to devise their own according to the circumstances they live with every day, WELL before the fire season.
Planning to leave? Plan it properly
Following can help make it real rather than an intention:
- Do you know the risk of late evacuation?
- Work through the constraints list above and see what is relevant for your household. Add extras if they apply.
- Work out how you can deal with each, in detail, in the context of “leaving early”.
- Run through a number of scenarios to see how they can work or not, adjust.
- Know what you are going to do before you leave; practice it and time it.
- Decide your destination before the season, not on the morning of a fire day. A specific address, not a direction.
- Confirm the arrangement in advance with whoever is hosting you — and be honest about what happens if the house burns and you need to stay for weeks, not hours.
- Know the route you will take; have a back-up if it is blocked.
- Have a pet plan that does not depend on solving the problem on the day. This includes which destination accepts pets and what happens if your first option falls through.
- Know your trigger: the fire danger rating and forecast conditions at which you will leave, decided in advance. Not ‘when it looks bad.’ A specific rating, a specific time.
- Keep the car fuelled through fire season. Petrol stations on exit routes can run low or queue on high-risk days.
- Leave before mid-morning on qualifying days. Fire conditions peak in the afternoon. Smoke visibility and road access can deteriorate rapidly once a fire starts. Early means early.
- Pack as if the house will not be there when you return: documents, medications, irreplaceable items, enough for several days.
- Practice leaving – time it.
- When things change – adapt and improvise!
Tolhurst’s specific assessment: Even under High or Extreme conditions a fire may start quite close to you and within an hour be impacting your property. The window between ‘thinking about leaving’ and ‘too late to leave safely’ is shorter than most residents assume.
Scenario 2: A fire has ignited in the Creswick Regional Park, you are leaving
- You do one last check of house (all doors and windows closed; furniture moved away from windows; wool curtains closed – if not wool take them down and store in cupboard; stow away loose items e.g. cushions; newspapers external shutters down; etc.)
- You turn off gas, electricity at the meter;
- You do a last check of Zone Zero, Zone I and your cleared exit route from house; remove doormats, ensure your wheelie bins are safely away from house and your neighbours;
- Your car is ready to go;
- You TEXT your contacts and TELL your neighbours you are leaving;
You LEAVE and follow your pre-determined route and arrive at your pre-determined destination BEFORE any bushfire event impacts your estate
Here is what FireSafe Marin suggests for their residents when a fire is approaching and they are leaving:
Here are the main points from this Fire Safe Marin video, framed as some background for your fire day action plan:
- The decision threshold These actions are for when you have two or more hours before a fire arrives, not when embers are falling. On a high fire danger day with no fire yet, or a fire burning nearby, these steps are worth taking. If your when to leave trigger comes, conditions deteriorate, or embers fall, leave immediately, skip everything else.
- Inside the house first Close all windows and doors. Close all internal doors to create compartments that slow fire spread and buy time. Turn on every light inside and out, even in daylight, approaching fire darkens the sky and lights help firefighters locate the house. Turn off all fans and air conditioning to prevent drawing smoke and embers through the house.
- Remove combustibles from around the house Move outdoor furniture cushions, wicker furniture, doormats, rubbish bins, and any firewood away from the structure, either 9 metres clear or brought inside. The goal is breaking the ember-to-ignition pathway in the immediate zone.
- Water Connect all garden hoses with nozzles and leave them accessible for firefighters. Fill buckets and position them outside, a backup if mains pressure fails.
- Gutters Last-minute check and clear if safe to do so.
- Practical actions that help firefighters Back the car in facing out. Prop open all gates, this breaks the fuel connection between timber fencing and the house wall. Place household ladders visibly near the roof line so firefighters can access the roof quickly without unloading their own.
- Vents Cover subfloor and attic vents with pre-made covers or heavy aluminised tape if time allows.
- Then monitor, until you can’t Patrol the property, watch the sky, stay connected to emergency alerts. When conditions change or embers appear, go.
Scenario 3: Your plan was to leave but now you can’t
- For reasons not expected, you have been delayed and embers have started to fall;
- You finally leave but you find your designated exit road is now blocked (e.g. tree down; too many late leavers have formed a bottle neck at Daylesford Rd);
- Vic Emergency messaging says, “Too late to leave, shelter in place”;
- You retreat back to your house;
- You put on your protective clothing, if you haven’t already done so;
- You enact your plan for “unable to leave”;
- You know, that if your house becomes untenable to stay you already know your best route to leave and it is clear of obstacles.
Plan A is scrapped. You immediately pivot to Plan B. You don’t dither – you breath.
The difference between active and passive sheltering and why it matters
CFA advises: Fires are unpredictable and plans can fail. Having a back up plan can save your life if you are caught in a fire. If you cannot leave the area, consider shelter options close by. These may include: a well-prepared home (yours or a neighbour) that you can actively defend; a private bunker (that meets current regulations) or a designated community shelter or refuge. (ED: there are no designated community shelters or refuges in Brown Hill.)
VicEmergency “Monitor and defend your property when the fire is nearby. Look for embers to put out on both the outside and inside of your property”
What the research says
The distinction matters. Active sheltering means continuously monitoring conditions inside and outside the house and responding: extinguishing small fires, preventing smoke entry, caring for dependants. Inactive sheltering is retreating to a room and waiting. The research is consistent: inactive sheltering significantly reduces your chance of survival.
Dr Raphaele Blanchi’s (CSIRO) research across Black Saturday, Ash Wednesday, and the 2019–20 fires put numbers on it: of 325 households studied, only 22 members sheltered inactively, almost always children, the elderly, or dependants who had no choice. The vast majority of adults were actively monitoring and responding.
Why passive waiting fails
The specific danger is hidden ignition. Embers can enter wall cavities, roof spaces, and underfloor areas and start fires that are invisible, burning unseen before breaking through. A house can be well advanced in fire before the occupants inside are even aware it has started.
Raphaele Blanchi: “The house can catch fire before people can even understand that happened.”
Signs the house is failing: You can no longer keep up with small ignitions: a window cracking and letting in more embers than you can suppress igniting close by furnishings; fire established inside a wall or ceiling cavity where you can’t reach it.
What active sheltering actually means
It is not passive waiting and it is not fighting fire. It is deliberate surveillance and targeted response. Justin Leonard (CSIRO) frames it directly:
Justin Leonard: “The reason for actively monitoring and moving around the house is that, in the early stages of a bushfire, the interior of a well-prepared structure is generally survivable. If something is found, it may still be within your means to act: suppress a small ignition, cover a cracked window, or protect a vulnerable area before it develops further. That is the active component of sheltering in place — not passive waiting, but deliberate surveillance.”
In practice, active sheltering means
Your role is NOT to fight the bushfire it is to only deal with embers/spot fires on and by the house – your zone zero. Your pattern of protection. Outside; Inside; Outside; with selective, short external actions. Post-fire evidence shows survivors going outside briefly, extinguishing spot ignitions, retreating inside repeatedly. This is not sustained firefighting; it is surgical interruption of ignition. You should already be in your protective clothing.
- Roaming through the house, not staying in one room. All parts of a well-prepared house are survivable in the early stages. Move through it and check every room.
- Checking the ceiling space. Embers entering the roof cavity can smoulder for an extended time before breaking through. If you can access the manhole safely with a torch, periodic checks are worth making.
- Watching for smoke from inside walls or ceiling. Smell and sound matter as much as sight, crackling from a wall cavity is a signal.
- Addressing small ignitions immediately – inside and out. A smouldering curtain or debris against a window can be dealt with using stored water while still minor. The same fire undetected for ten minutes cannot.
- When you come inside use this time to loosen your clothing; cool your head and face; drink & eat to your schedule. Button up before going outside again.
- Knowing when to stop and leave. If a section of the house has ignited and is developing into a full structure fire, the clock has started.
NOTE: Avoid the bathroom. Blanchi’s research specifically identifies the bathroom as a commonly chosen but poor shelter room: no visibility to the outside, typically one door with no direct exit, and children were frequently confined there alone. The instinct to retreat to the bathroom, possibly inherited from cyclone guidance, does not apply in a bushfire.
You need to be able to see what is happening outside, and you need more than one way out. If your house catches fire while you are in it you will need to respond quickly. It is critical to maintain visibility to know what is happening outside with the fire.
Managing bushfire smoke entering the house
An unexpected smoke alarm activating during a fire event is more common than most residents realise. The noise, on top of everything else happening, can be a distracting and unsettling addition to an already stressful situation. The following are a few points to consider, and include in your plan:
- Close up the house: Close all windows and doors, place wet towels or blankets (wool or cotton) around window and door edges to help stop smoke and embers getting in;
- Keep exit door openings brief: when going in and out, especially for suppression activity;
- Evaporative Air Conditioner (cooler) filter pads can ignite if dry: cellulose filter pads are combustible; fit a non-combustible ember screen before fire season;
- Switch the Evaporative Air Conditioner to recycle/recirculate mode, as it could otherwise draw in smoke from outside, or turn off;
- Do you have a ducted air conditioning system with a fresh air intake? This should also be switched off or set to recirculate but you need to check your manual and contact the manufacturer/installer, as this varies by system, and obtain their advice;
When smoke is over your house or ash starts to fall:
- If Evaporative Air Conditioner can run water over the filter with the fan turned off, continue to do so; otherwise turn it off;
- If a smoke alarm activates and it’s smoke haze, not an internal fire: mute it (using broom handle if out of reach); if smoke does not clear, expect to repeat roughly every 10 minutes; check for real ignitions once muted, don’t assume it is a false alarm;
- Before fire season, locate and test your alarm’s mute button so it’s not new to you on the day; on fire day make sure a broom is close by if/when alarm activates.
Knowing when to abandon the house — two triggers, not one
Active sheltering buys you time, time for the ember storm around your house to ease, not just time for a single fire front to pass. In a town fire, ignitions can be happening at different stages all around you, for hours. The goal is simply to keep your house viable for as long as possible.
There are two triggers that tell you your house will become untenable. They are not the same, and they don’t give you the same amount of time.
- Trigger 1: Your house is failing. You can no longer keep up with small ignitions: a window cracking and letting in more embers than you can suppress, igniting close by furnishings; fire has established inside a wall or ceiling cavity where you can’t reach it.
Close the door to the room that is on fire; move to the next, closing doors behind you, working toward your predetermined exit point. Each closed door slows the fire and adds to the time your house can still shelter you. When your last defensible room starts to fail, that is the point of no return: leave via the route you have already planned, in one deliberate step.
- Trigger 2: A neighbouring house ignites. This is different, and more urgent. At the separations typical of estate housing (3-6m), there is little or no buffer once this happens. Treat it as the signal to move to your predetermined exit point, closing all doors on your way; not to wait and monitor.
At the 3–6 metre separations typical of estate housing, a fully involved neighbouring house generates radiant heat that can crack windows and ignite your structure even if your house has not yet been touched by embers directly. Leonard’s post-fire surveys documented house-to-house transfer as a significant secondary mechanism at exactly these separations. A burning house next door is not something you monitor from inside. It is a signal to prepare to leave.
Before leaving remember: Ensure you have on your person (in pockets of your protective gear) the last items to take with you (refer to the Pocket Kit); your full water bottle; your hat; goggles; mask, and a spare; gloves; woollen blanket. All members of the household need to be in protective gear, and have their own water bottle and blanket.
Your exit strategy must be decided BEFORE the event
If either trigger is fully reached, you will need to leave. That decision, which door, which route, to where, must be worked out well beforehand, not improvised under heat, smoke, and fear. This needs to be documented in your Plan. Think through more than one exit pathway and understand what each means in practice:
- Would you have to traverse a deck/stairs to exit?
- Is there another route if the deck is burning?
- Would there be any obstacles (deck chairs, potted plants, kids bikes) that could impede an uncluttered exit when visibility is compromised by thick smoke?
- Is there a close neighbouring house on the side of your primary exit? Is there another clearer route to exit? Where do these exits immediately lead to – side gate, driveway, nature strip, asphalt/dirt road?
The greatest danger when in the open is radiant heat – revisit radiant heat section – what protects you:
- As radiant heat travels in straight lines by doubling your distance from the heat source you reduce the radiant heat load by four;
- As radiant heat travels in straight lines it is blocked by anything solid;
When you are planning your exit strategy, remember that thick, wind-driven smoke can reduce visibility to near zero, and people have become disoriented within metres of their own house in exactly these conditions. This is a real risk, not a remote one, thick smoke can turn even familiar ground unrecognisable within seconds.
Why smoke disorientation happens. People don’t navigate familiar places by memory alone, they do it by constantly matching what they see against what they expect to see. Thick smoke removes that entirely, and knowing a place well doesn’t compensate for it: without visual reference points, even short, familiar distances become genuinely difficult to judge.
Deciding your route and your barrier in advance doesn’t restore that visual feedback, but it means you’re not also trying to make that decision blind. You’re executing a plan: a known number of steps, a hand kept on a fence, a route you can walk by feel or memory of turns rather than sight, but it needs practice well before needing to put it into action. Practicing in the dark or with your eyes blind folded might be a useful experiment.
Where will you exit to? CFA guidance is, when needing to move outside, find already burnt ground as soon as possible. Moving to unburnt ground while fire is still active is significantly more dangerous. Remember that any already burnt ground will still be hot. Protective clothing including sturdy footwear for all household members is a MUST along with 100% woollen blankets for each.
Wherever possible try to put a solid object or barrier between you and the fire (the radiant heat source closest to you). Get low, get covered. Crouching or lying flat reduces the area of your body directly exposed to radiant heat and puts you closer to cooler air near the ground. Cover yourself completely with a woollen blanket, including your face, and stay behind anything solid you can find, any solid mass between you and a burning structure blocks radiant heat, some examples: a brick retaining wall; concrete or masonry gate pillar, the far side of a parked car; a mound of earth can offer similar protection, lie flat so its lip shields you.
Preparation is what makes active sheltering possible
Katharine Haynes (University of Wollongong), whose Black Saturday sheltering research with Blanchi is the most comprehensive study of its kind, frames the outcome plainly:
Katharine Haynes: “Despite a general lack of awareness and preparedness for sheltering, when the fires threatened, most people were able to shelter actively and safely, and monitored what was happening and took actions to protect themselves and other people. And the research shows that people who had the best sheltering experiences had undertaken planning and preparation.”
The preparation that enables active sheltering is the same preparation described throughout this page: ember-proofed structure, Zone Zero cleared, stored water accessible, protective clothing for all household members, exit routes identified and clear. None of it is improvised on the day. All of it is done well in advance.
Independent survivability
After the worst appears to be over – the phase most guidance skips
Once the main threat has passed and CFA resources shift to evacuating survivors and assessing damage, it can look and feel like the danger is over. It isn’t. The Canberra 2003 research (already cited on this page) found new house ignitions occurring for hours after the fire front had passed, not from renewed fire activity, but from embers that had already landed earlier and were still smouldering, undetected, until they found enough fuel to flare.
This creates a genuine tension. Authorities’ priority at this stage is understandably to move people out of the area, search and rescue, clearing roads, assessing structural safety. But a resident who is still with their house, and stays a little longer to keep checking their own property and immediate neighbours’ for exactly this kind of delayed ignition, is doing something valuable. It has real value precisely when it looks least necessary.This isn’t a reason to ignore official direction to leave — but if you are still on your property in this phase, don’t assume that because the fire front has gone through, your job has finished. Keep checking gutters, roof spaces, garden beds and fence lines for as long as you can.
Sources: Dr Raphaele Blanchi, BRI Webinar 5 2021, ‘Your sheltering options’; Dr Justin Leonard, BRI Webinar 3 2023, ‘Reducing risks for people and houses’; Dr Katharine Haynes, BRI Webinar 5 2021 panel discussion, all available at bushfireresilience.org.au. Blanchi & Leonard (2005), Investigation of Bushfire Attack Mechanisms Resulting in House Loss, ACT Bushfire 2003, CSIRO/Bushfire CRC.
Tools & Equipment for Active Shelterers
Remember: The basics of how fire burns – for a fire to continue to burn it needs oxygen, heat and fuel – take one away and the fire will go out.
If you find yourself having to actively shelter here are some basics that could assist:
Why water can be unreliable – use it wisely
- Water pressure warning: During a major fire event, mains water pressure can drop significantly as demand across estates peak.
- Do not assume your garden hose will deliver adequate pressure when you need it most. Pre-fill baths, laundry tubs, large buckets, wheelbarrow, clean drums, troughs, garden ponds, empty wheelie bins, before a high fire danger day.
- If you have a domestic water tank – ensure pre-season, that a suitable external tap is fitted to fill buckets AND the tank is full at start of season.
- Water in buckets/containers also needed for internal use – to deal with small ignitions, cooling AND for drinking.
- Be aware that spraying water into a fully involved neighbouring house does nothing to save yours.
- Use only what is needed to break the fire. Do not disperse water broadly.
- Prioritise: any smouldering material within your zone zero of the house, especially at the garage door and fence junctions.
- Most effective uses of water: wetting specific ignition points; knocking down small spot fires; interior suppression of early ignitions.
- A soaked natural fibre fabric or leafy branch can be used to swat small surface fires — combining wetting with smothering and using less water than pouring
Remember: Your role is NOT to fight the bushfire it is to only deal with embers/spot fires on and by the house – your zone zero. Your pattern of protection. Outside; Inside; Outside; with selective, short external actions. Post-fire evidence shows survivors going outside briefly, extinguishing spot ignitions, retreating inside repeatedly. This is not sustained firefighting; it is surgical interruption of ignition.
Basic equipment
- Garden hose/s; buckets and anything else that will hold water; cotton mops; rakes, hoe or shovels; water sprayers
- Sturdy ladders for checking ceiling space, blocking gutters, and checking roof for ember build-up. NOT for climbing on roofs.
- Wool or cotton blankets and towels. When wet they can be used internally to seal gaps around windows and doors to stop smoke entering.
- Downpipe or gutter plugs: To fill your gutters with water you will need a way to block the downpipes.
Tips for garden hoses/water sprayers
Make sure that hoses are long enough to reach all around perimeter of house
- Keep strategically located buckets full in place
- Use a nozzle with an adjustable spray pattern. A solid stream for direct application to burning material; a spray for wetting surrounding surfaces.
- Direct the stream at the base of the fire, at the burning material, not at the flames above it
- After knocking down the visible fire, wet the surrounding ground and vegetation thoroughly to prevent reignition from residual embers
- Patrol the area for several hours afterwards. Embers can smoulder in mulch, leaf litter, and debris for hours before flaring
Tips for buckets of water
When mains pressure fails, pre-filled buckets become your primary resource. Fill baths, laundry tubs, and large plastic bins the day before a forecast high fire danger day. Stage buckets at accessible points inside and left at strategic locations around the house. Buckets preferably galvanised – obtain from Mitre 10/Bunnings – also sturdy plastic work buckets.
- Target the base of the fire, not the top of the flames
- Use a sweeping side-to-side motion while pouring to cover the full area of the spot fire
- Douse and stir: if the fire involves embers or debris, pour water, stir the debris with a stick or shovel, then pour more water. Repeat until the hissing stops completely
- Do not throw the water forcefully at the fire, this scatters burning embers and can spread the fire
- Keep a safe distance, water poured onto very hot material can produce a sudden burst of steam
Tips for wet mops
A wet mop is particularly effective for ember management in the areas immediately around the house: gutters, against door frames, under decking, on balconies, near window ledges. It smothers and cools embers precisely, without scattering them the way a pressurised spray can. Strategically place buckets around perimeter of house and keep full. Move hoses and the mops TO buckets.
- Use a long-handled mop to maintain safe distance from heat
- Use an old-fashioned cotton mop head, synthetic mop heads may melt
- Thoroughly soak the mop head in a bucket of water
- Douse the flames or press the mop onto smouldering embers and material
- Smother: hold the wet mop flat onto the fire to cut off the air supply
- Stir and cool: use the mop to break apart smouldering debris, mixing it into wet ash or wet soil
- Re-wet the mop and repeat until all smoke and hissing stops
Tips for rake, hoe or shovel
A rake, hoe or shovel suppresses fire by removing fuel (starvation) or by breaking up and separating burning material. These tools are most useful for ground-level surface fires, burning leaf litter, dry grass, and debris.
For smothering – shovel or spade
Soil or sand suppresses fire by smothering, cutting off the oxygen supply. This method is most useful when water is unavailable or exhausted. It works on small, outdoor, solid-material fires (wood, bark, leaves). It is not a substitute for water. A children’s sand pit would be ideal.
- Gather a substantial amount of dry soil, sand, or dirt. Dry material works best; slightly moist material also assists cooling
- Use a shovel or spade, not your hands, to scoop and apply
- Pour a thick, complete layer over the entire burning area. Partial coverage leaves openings for the fire to continue
- Stir and mix: use the shovel to mix the soil thoroughly into the ash and burning material. This breaks up hot coals
- If smoke or heat is still present, add more material and repeat
- Do not dump and leave. Soil or sand can make a fire appear extinguished while it continues to smoulder underneath for hours. Always mix, check, and confirm.
- This method is effective only on small fires. Do not attempt to smother a fire that has spread beyond a small, contained area
- Water is preferable where available — it both cools and smothers
For breaking up fuel – rake or hoe
A rake or hoe suppresses fire by removing fuel (starvation) or by breaking up and separating burning material. These tools are most useful for smaller ground-level surface fires, burning leaf litter, dry grass, and debris.
- Use a metal rake or hoe with sturdy long-handled. Plastic garden rakes melt in fire conditions and add to the fuel load
- Use the rake or hoe to pull burning debris away from structures, fences, and unburned vegetation
- Spread burning material thinly, isolated embers extinguish faster than a concentrated fuel pile
- Follow up with water or soil once material is separated
Note: The Bare Bones Tubs & Kits Checklist has a shortened version included as Kit 4: Ember Kit: as a memory jogger.
Returning to where we started, Dr Kevin Tolhurst advice…
This page has covered the ‘what’ and ‘why’ of ember-proofing, the risks and complexity of living in estate housing, and actions for high fire days. Kevin Tolhurst’s four points remind us that preparation doesn’t stop at the house, it’s collaborating with your neighbours, and knowing your triggers. That’s where the next planning page begins.”
- Get to know your neighbours: share your bushfire plans and find ways to work together. Even 3 or 4 households could do much to lower the fire risk to themselves and their neighbours.
- Stay informed: Work out alternative ways to keep informed of possible fire threats to the area and how to share that information amongst your neighbours. Watch the weather!
- Give your house the best chance of surviving by preparing your property well before the fire season irrespective if you plan to stay and defend or leave.
- Have a bushfire plan: know what you are going to do pre-season; on high fire risk days and days leading up to them; decide if you are going to leave, or stay and defend, and then have a plan to know what to do if circumstances change; know the triggers for when decisions will be made; review your plan regularly.
Disclaimer: The information on this page is drawn from publicly available fire science research, expert assessments, and official guidance, and is provided in good faith to help residents understand their situation and make their own informed decisions. It is not official advice from CFA or any emergency service. Every property and household is different, residents should assess their own circumstances before acting.
AFAC (Australasian Fire and Emergency Services Authorities Council). Bushfires and Community Safety Position (2019, Version 6) is a policy document for fire and emergency service agencies. Quoted here as evidence of the official evidence base underpinning this information. This document (2019, Version 6.0) was scheduled for review April 2024; no updated version located at time of web page publication.
For live emergency information: VicEmergency app, ABC Ballarat 107.9FM, or 1800 226 226. In an emergency, call 000.
Sources: Ember-proofing & Zone Zero page Part 2
- Dr Kevin Tolhurst AM — as Part 1; also Scenario 3 references and closing section.
- Jack Cohen — as Part 1 (HIZ foundation, referenced throughout Section 2).
- Dr Justin Leonard, CSIRO — as Part 1; also the five-priorities framework (roof/gutters, garage, bark mulch, fencing, wheelie bins), BAL/consequential fire quotes, and active-sheltering quote — BRI Webinar 3 (2023) presentation transcript.
- Blanchi, R. and Leonard, J.E. (2005) — as Part 1; also cited for the “Independent Survivability” graphic.
- Dr Raphaele Blanchi, CSIRO — BRI Webinar 5 (2021), Your Sheltering Options — sheltering behaviour data (325 households, active vs inactive), “the house can catch fire before people understand that happened” quote.
- Dr Katharine Haynes, University of Wollongong — BRI Webinar 5 (2021) panel — sheltering research and preparation outcomes quote.
- Dr Danielle Clode, Flinders University — BRI Webinar (Triggers/Panel) — quotes on leaving early being genuinely difficult.
- Dr Rob Gordon OAM — as Part 1; also cited on leaving-decision triggers in Scenario section.
- Joan Webster OAM — as Part 1.
- FireSmart BC — firesmartbc.ca (walk-your-house video)
- Fire Safe Marin (#FireSafeMarin video series) — firesafemarin.org: Deck protection video; Fire-Smart landscaping video; Fence video (Steve Quarles/Todd Lando); “What to do when a wildfire is near your home” video; Zone Zero and Zone 1 recap videos (Aug 2025)
- NFPA — What Is the Home Ignition Zone? — nfpa.org/news-blogs-and-articles
- CFA — Suburban Garden Landscaping for Bushfire guides (x2 PDFs); Designing your garden for bushfire (video); Leave Early guidance page
- VBA (Victorian Building Authority) & CFA — A Guide to Retrofit Your Home for Better Protection from a Bushfire (2014)
- DFES (WA) — InfoNote: Bushfire Ember Protection Screens (evaporative cooler screens)
- CFS SA — preparing your home/property (cited in retrofit footnotes)
- St John Ambulance Tasmania — First aid fact sheets: smoke/embers in eyes, asthma emergency, heat-induced illness
- Red Cross Australia — Get Packing checklist
- University of Newcastle (2024 study) — Black Summer survivor research, 36 factors influencing why households don’t leave
- Creswick Woollen Mills — personal protection/thermal blanket info
- Bushfire Resilience Inc. (BRI) webinar transcripts — multiple direct links to bushfireresilience.org.au PDF transcripts (Webinar 3, 5, Triggers Panel)
- Radiant heat shielding principles — crouching/lying flat to reduce exposed body area, and using any solid barrier to block radiant heat (which travels in straight lines) — consistent with established wildland firefighter safety training on radiant heat exposure. General fire physics rather than a single named study.
- Spatial orientation research — human navigation relies primarily on vision, matching what is seen against what is expected from memory of a route; loss of visual reference measurably impairs navigation even in familiar settings. General findings from spatial-orientation and wayfinding research, not attributed to a single study.
-