
For live emergency information access: VicEmergency app, ABC local radio (for Ballarat – 107.9FM), or VicEmergency Hotline – 1800 226 226. In an emergency, call 000
Brown Hill FireAware Network
Prep before plan: Home Ignition Zone & Zone Zero (PART 1)
Start here if this is your first visit
This page is a reference resource for practical ember-proofing actions and fire season planning: what to do, when to do it, and why it matters for the specific housing type in Brown Hill northside. It works best once you’ve been through the anchor page first: “What you need to know when you can’t leave.” That page gives you the context for why these actions matter, and its links will bring you directly to the relevant section here.
- If you’ve arrived here directly, welcome, but we suggest starting there as well → “What you need to know when you can’t leave.”
- Already been there? Use the section links at the top of this page to find what you need.
This is Part 1 of 2. It covers what you need to understand before you write a plan or start ember-proofing: fire behaviour basics, radiant heat, protective clothing, fire danger ratings, and the Home Ignition Zone science that everything else is based on. For the practical, on-the-ground actions, what to actually do, zone by zone, see Prep before Plan (Part 2).
What you will find on this page:
Video and notes: Where the risk assessments lead: Kevin Tolhurst’s starting point for action (video & transcript)
SECTION 1
WHAT YOU NEED TO UNDERSTAND before you write your plan or start ember-proofing
- FACTS on what is fire (video); FACTS how fire burns; how wind can change fire danger;
- FACTS on radiant heat
- FACTS on protective clothing; remember to drink water/fruit juice to avoid dehydration (PDF); FACTS on woollen blankets;
- FACTS on Fire Danger Ratings; Monitoring Rule: 30/30/30 +L
Looking at the risk profile for estate houses is there anything I can do? YES, by apply Home Ignition Zone guidelines.
Revisit the risk assessment for your location first? Access this link
Basis for all ember-proofing activities: The core concept of the Home Ignition Zone (video)
- What the science says about Home Ignition Zone
- But where is this research of HIZ being put into practice: Fire Safe Marin & Firewise USA
- Let these videos speak for themselves: Fire Safe Marin – What is Defensible Space? Get to know your Zero Zone (video); Fire Safe Santa Barbara Co. An Introduction to Firewise USA (video)
The urban-rural fringe compromise: where zones overlap
Do you know that Brown Hill is in a Bushfire Prone Area? NO? refer to this FireAware page for maps and more details; does your house have a BAL rating? finding your BAL rating; two things to know about BAL ratings
About the information on this page…
The practical guidance on this page is drawn from fire science research, expert assessments, and official guidance, including Joan Webster OAM, CSIRO post-fire surveys, Bushfire Resilience Inc. webinar content, and CFA publications. It is offered to help Brown Hill residents understand how to reduce their fire risk through ember-proofing and the Home Ignition Zone guidelines, to inform their own decision-making. While specifically focused on Brown Hill’s northside estates, the guidance is as relevant to other Brown Hill locations. It is not official CFA advice, every property is different, and residents should verify specifics and assess their own circumstances before acting.
Where the risk assessments lead – Kevin Tolhurst’s starting point for action
Access background on Dr Kevin Tolhurst here
- Get to know your neighbours: share your bushfire plans and find ways to work together. Even 3 or 4 households could do much to lower the fire risk to themselves and their neighbours.
- Stay informed: Work out alternative ways to keep informed of possible fire threats to the area and how to share that information amongst your neighbours. Watch the weather!
- Give your house the best chance of surviving by preparing your property well before the fire season irrespective if you plan to stay and defend or leave.
- Have a bushfire plan: know what you are going to do pre-season; on high fire risk days and days leading up to them; decide if you are going to leave, or stay and defend, and then have a plan to know what to do if circumstances change; know the triggers for when decisions will be made; review your plan regularly.
Remember: If a plan is not written down and practiced – it is NOT a plan!
Note: To revisit Kevin’s risk assessment for your location, click on this link.
SECTION 1: What you need to understand before you write your plan or start ember-proofing
The sections below are not a detour, they are the foundation for every action that follows. Understanding how fire behaves, what radiant heat does to your body, and how fire danger is measured is what makes the practical guidance in the next two sections work.
FACTS: What is fire?
When fire enters an urban environment, it is not a monster, it does not think, or have an intent to inflict harm – it is following the laws of physics. The same process applies to any material on or around your home – bark mulch, a timber fence paling, debris in a gutter. Embers land, gases ignite, the chain begins. The earlier it is interrupted, the less water and effort it takes to stop it.
Fire is a chemical reaction that occurs when flammable objects combust and produce heat. Three elements are necessary to ignite and sustain a fire, fuel to burn, heat to ignite the fuel, and oxygen to sustain the fire. These elements are often represented as a fire triangle. Source: CSIRO Best Practice Guide
HEAT: Fire requires a heat source to ignite and support the combustion process. Lightning strikes are a type of natural heat source, however, the majority of bushfires start because of human activity. This includes poorly managed campfires, damaged powerlines, sparks from power tools, and arson.
FUEL: There are many different materials which can fuel a bushfire, the majority being forests, grasslands and other types of vegetation. When a bushfire meets an urban area, the fire will spread using any combustible fuel that is available. This might include cars, wood heaps, sheds and houses as well as trees and other vegetation in the area.
OXYGEN: Oxygen is necessary to support the chemical reaction (called oxidation) that causes fuel to burn. When fuel burns, it reacts with oxygen from the surrounding air, releasing heat and generating gases, smoke and embers.
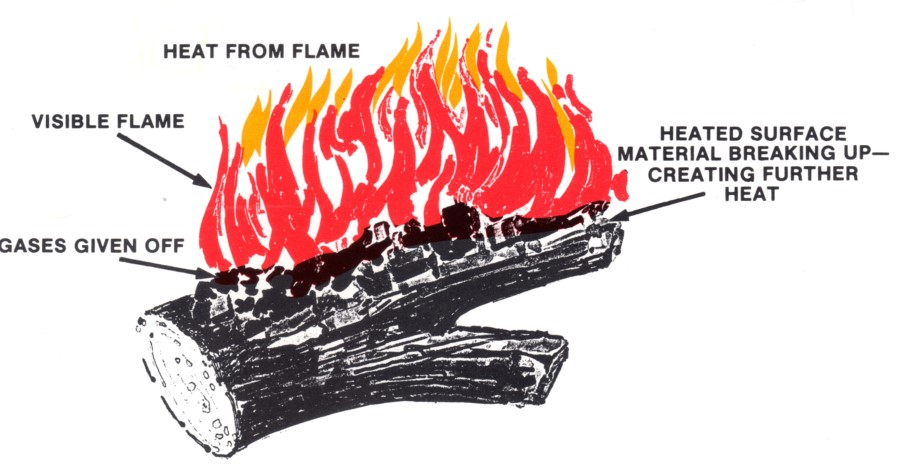 An example: How fire burns a log: Looking at fire, in simple terms, we find it follows the laws of physics, it is a chain reaction where heat (from possibly many continuous hot days) is generated as moisture is driven out of the fuel (e.g. a log) as this heating from this drying process continues the heat gets to a stage where flammable gases are released and mix with oxygen in the air. All that is needed now is an ignition source, embers, burning fragments often as hot as the fire that created them, provide exactly that. The gases ignite, fire ensues. If this process is not interrupted the burning gases produce more heat causing other material in the log to release more gases and the process continues to build.
Next time you have a camp fire or light the pot belly – have a look for yourself how fire works and how you put it out. For the pot belly you shut the door and close the vents – you have taken away the oxygen; for the campfire you put water on the material that is left (to cool) and then then cover it with soil – smothering – removing the oxygen.
This has now fulfilled the Fire Triangle: heat + fuel + oxygen – remember that the way fires go out is by taking away one of these elements. In the case of the burning log the whole burning process relies on the heat generated by the material breaking up on the surface of the log. To extinguish the fire is to cool the log. Attempting to extinguish the flames is a useless exercise as the heated log will merely give off more gases; the answer is TO COOL THE LOG, in this case with water.
The most important single principle of firefighting is to always direct your water hose (bucket) at the burning material and NOT at the flames (Source: ACT Bushfire Council)
FACTS: How does fire burn
 A bushfire is any uncontrolled fire burning in a forest, woodland, scrub or grassland. These fires are unplanned, but they are a natural feature of the Australian landscape. Many of Australia’s trees and plants need fire to regenerate, and many have adapted to the harsh conditions our climate delivers. Fuel combusts when the heat source makes it hot enough to ignite. How easily the fuel ignites and (and then burns) depends on the type and amount of fuel, the shape and size of the fuel source, and its moisture content (the amount of water the fuel contains). Wet fuel will not burn, although it can be dried out enough from the heat of a bushfire to ignite.
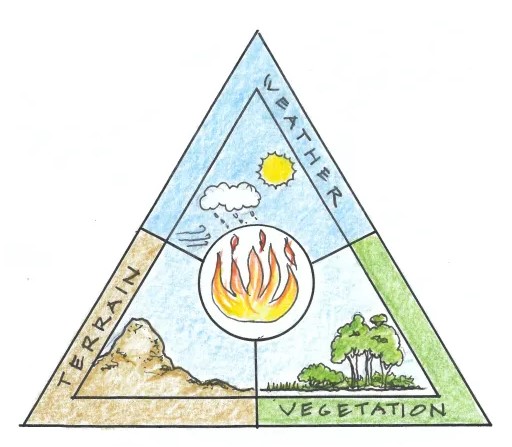
The fire behaviour triangle: The behaviour of a bushfire, such as its intensity and how quickly it moves, depends on three factors: vegetation, weather, and terrain. This is known as the fire behaviour triangle – because all three factors combine to shape the characteristics of the bushfire. Access more information through the links in the text – vegetation, weather & terrain.
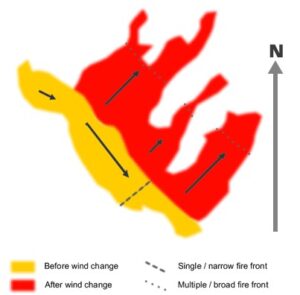 How fire danger can change with a wind change: On hot summer days how often do we look forward to a southerly change to bring some relief from the heat. But when there is an active fire in the area this can increase the danger in many way.
Wind is a major controlling factor that determines rate and direction of spread, and shape of fire. This diagram illustrates the fire that can result from a change in wind direction. Notice that a change in wind direction from the NW to SW has caused the flank fire to become the new fire front — much larger and potentially more difficult to control than the original narrow front.
Remember: Always watch the weather and anticipate how a wind change can change what you are facing.
FACTS: What is radiant heat?
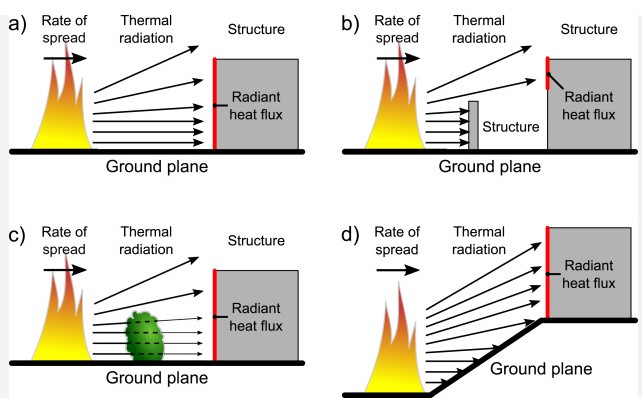 Radiant heat is invisible energy travelling in straight lines, like sunlight, but in order of magnitude more intense. It heats whatever it strikes before any flame erupts. It passes through glass. It is blocked by solid objects. Radiant heat is the biggest killer in a fire. The human body cannot absorb large amounts of radiant heat without its cooling system failing, leading to heat exhaustion and heart failure.(This image shows thermal radiation & radiant heat. The difference? A hot toaster emits thermal radiation (infrared) in all directions; the heat you feel on your skin when standing near it is the radiant heat.)
The scale matters. The sun on a hot dry summer day produces about 1 kW/m² of radiant heat flux felt on your skin. Sitting close to a campfire you feel roughly 3–5 kW/m². Unbearable pain on exposed skin occurs at around 5 kW/m². Spontaneous combustion of wood occurs at 12–13 kW/m². Standard window float glass cracks at approximately 14 kW/m². A burning timber fence adjacent to your house easily exceeds all of these thresholds.
A fully involved single-storey house fire generates approximately 3,000 – 5,000kW of radiant output typically resulting in a radiant heat flux of 12.5 to 25kW/m2 at a distance of 2m. At 6m distance the radiant heat flux is nearly halved at 6.6-11.1kW/m2. Critical limit for firefighter safety in protective gear is 10 kW/m2.
By the time it hurts, damage is already occurring. Pain is a lagging indicator. If radiant heat is uncomfortable on your skin, go inside immediately, or seek protection behind a solid object – don’t wait until it becomes unbearable.
Two things protect you from radiant heat: distance and solid barriers:
- Distance: Double your distance from the heat source and the load drops to one quarter. This is physics, not opinion. It is why moving even a few metres away from a burning object buys you meaningful time.
- Solid barriers: Radiant heat travels in straight lines and is blocked by anything solid — a brick wall, a steel fence, a non-burning shed, even a substantial tree trunk. Standing behind a brick wall puts you in shadow from the heat; standing at a window does not.
FACTS: What is Protective Clothing?
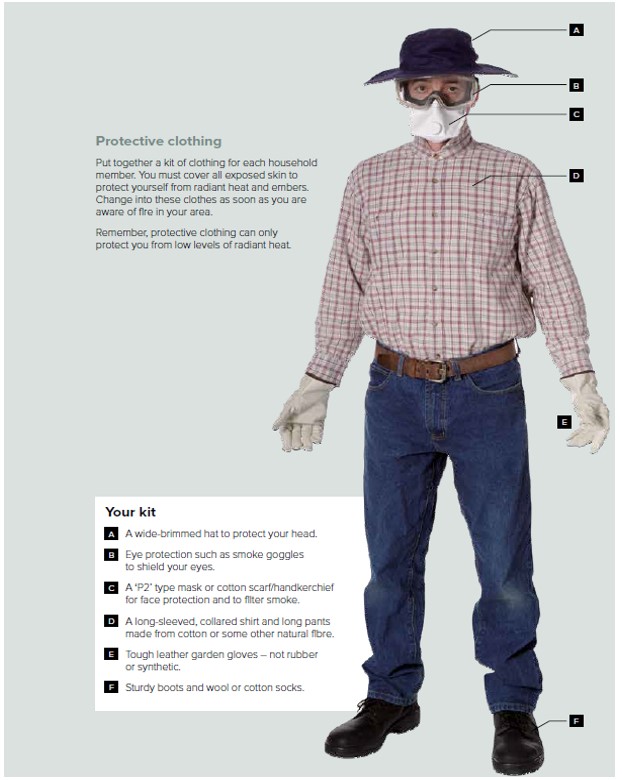
Why understanding radiant heat matters outside your house: Even if not actively defending a home, protective clothing protects against burns from intense heat and flying embers. It is recommended to have these items in your Protective Gear Tub along with woollen blankets. Despite the heat, it is important you do not wear summer clothes during a fire. In the event of fire everyone involved should wear 100% natural fabrics such as cotton, denim or wool – synthetics can melt or burn.
Anyone going outside on a high fire danger day, when fires are in the area, must wear protective clothing. Even when travelling on a high fire day have your protective gear handy.
- Wide brimmed hat to stop embers from dropping on your head or down your back. Ensure it can be tied under your chin. If you have long hair tie it up, tuck under your hat;
- Pair of goggles to safeguard your eyes against smoke, embers and debris in the air. Carry with you a bottle of artificial tears or gel – to avoid drying of eyes and grit irritation. Also a demisting spray to prevent goggles fogging up.
- P2 mask with valve to cover your nose and mouth to protect you from inhaling smoke and embers. Or cotton scarf/handkerchief/teatowel for face protection to filter smoke. Masks can be obtained from Bunnings; Hip Pocket Workwear; RSEA Safety; other workwear stores;
- Long sleeved collared shirt made from thick cotton or wool to prevent burns to the upper body and arms
- Pair of heavy cotton pants or overalls to shield your legs. Op shops may be a source for these items. (Stretch jeans are not appropriate as they contain synthetic elastic fibres)
- Sturdy leather work boots and a pair of wool or cotton socks to prevent burns to the feet
- Tough leather garden gloves or work gloves to protect your hands – not rubber or synthetic
Lay this clothing out before a high danger day. Do not be searching for a woollen jumper etc. while embers are falling. All members of the family need to have their own kit of protective clothing. When outside everything needs to be tucked in, loosen garments when inside.
Sometimes you may read that it is ok to wet clothing in a fire situation. To clarify no source recommends wetting protective clothing. Keep protective clothing dry. Wet natural fibres transfer heat to skin faster than dry ones, dry wool chars slowly and insulates; wet wool conducts. The one exception is a face covering over the nose and mouth: a damp cotton scarf or teatowel filters smoke particles better than a dry one. However, P2 masks must stay dry, wetting compromises the filter.
Remember to drink water/fruit juice regularly to avoid dehydration. Drinking and eating, do it on a schedule, not on feeling
Dr Rob Gordon OAM, psychologist and trauma expert who has worked with bushfire-affected communities including locally at Scotsburn: “High arousal shuts down the body’s normal feedback system, you will not feel hungry, thirsty or tired until you are seriously depleted.”
- Drink approximately 250ml (one cup) every 15–20 minutes while active, set a reminder if needed
- Do not drink more than approximately 1.5 litres per hour
- After the first hour, plain water alone is not enough, include something with salt or sugar: fruit juice, a piece of fruit, crackers, or a sports drink
- Eat something small regularly, blood sugar drops under sustained adrenaline and you won’t notice until your thinking is already impaired
- Rest briefly every 30 minutes, “Do this on a schedule, not when you feel like it” (Gordon)
Know this warning, it may apply to you: If you develop a headache, feel confused or increasingly unwell despite having drunk a lot of water, stop drinking water and have something salty (food, a sports drink, salted crackers). This may be overhydration, not dehydration. The treatment is different. Get inside, rest, and if you are not improving, call for help.
For further detail with sources: Hydration on a High Fire Danger Day
FACTS: on wool blankets
Fire authorities, CFA, RFS, highly recommend carrying 100% woollen blankets in emergency kits and vehicles as a vital safety measure against bushfires. They are considered a crucial protection tool against radiant heat and embers, which are primary causes of injury during bushfire emergencies. Wool is naturally a flame retardant fibre and can help shield from the effects of radiant heat. The structure of wool fibre needs more oxygen than what’s available in the air to become flammable. For this reason, it’s important the blanket in your fire kit is 100% wool as synthetics can melt and burn easier.
If you do not have any wool blankets in your linen cupboard you might be able to pick some up in op shops or The Mills in Ballarat, Daylesford or Castlemaine. You will need to check the labels. If you are not sure if it is 100% wool, pull a few threads and hold a flame to them, wool chars and smells like burning hair. Synthetics melt, bead, and smell like chemicals. A synthetic blanket in a fire scenario is dangerous. Ensure that the woollen blanket you buy does not have satin edging, which will burn. If you think that the blanket is overly thin you could doubled it over or sew two thin blankets together.
Two possible uses:
- As a stationary heat-facing layer, braced against a window on the interior side during ember attack, a wool blanket can help to slow radiant heat transfer and can help to hold cracked glass in place if the window fails.
- As personal protection if the house becomes untenable and you need to move to unburnt ground, wrap it over your protective clothing. Dampen only a corner to cover your nose and mouth for smoke filtration, if you do not have a mask. Do not wet the whole blanket.
New blankets: Wool/Aramid blankets, available from Creswick Woollen Mills, add the fibre used in firefighter PPE for higher sustained heat resistance. They also have other “personal protection” wool fire blankets. Worth considering, but an old wool blanket is far better than nothing, and far better than anything synthetic. Store it with your protective clothing.
FACTS: Fire Danger Ratings
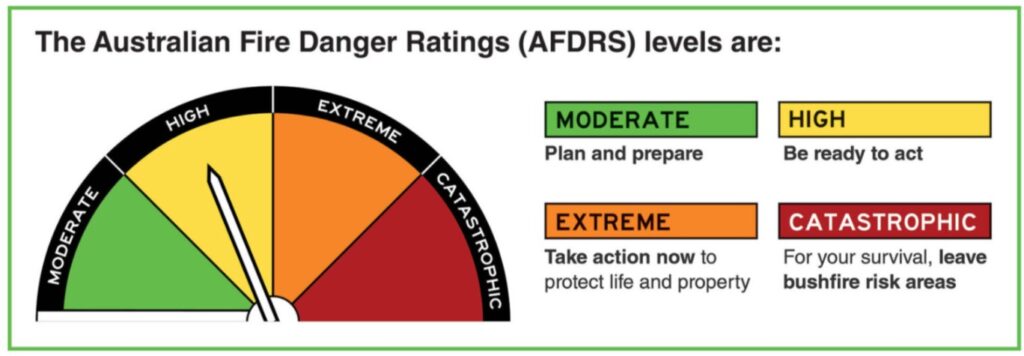 The Australian Fire Danger Rating System (AFDRS) replaced all previous state-based systems on 1 September 2022. It introduced four nationally consistent ratings based on the Fire Behaviour Index (FBI), a calculated measure drawing on weather, fuel moisture, vegetation type, rate of fire spread, flame height, fireline intensity, and spotting distance.
Fire danger ratings indicate how difficult it will be to control or suppress a fire.
The fire behaviour index (FBI) is a scale of potential fire behaviour. It ranges from zero to 100 and beyond. 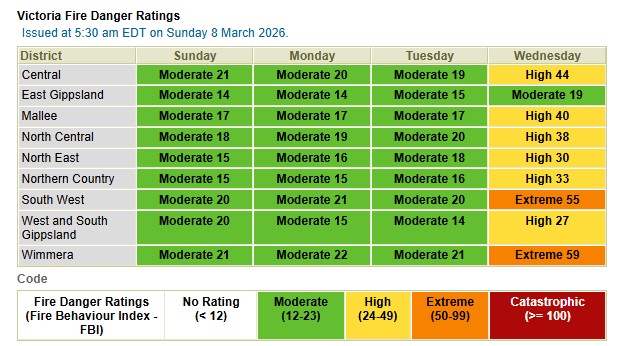 Higher values mean more dangerous fire behaviour and greater fire danger risk. Fire agencies use the FBI to inform decisions about the fire danger rating for a district. They also take into account information about other conditions.
On the BOM website you can view Victoria’s Fire Danger Ratings through the FBI Index (see image as an example for 8 March 2026, Brown Hill is in Central District)
The Four Ratings: What Each Means
NO RATING (white band below Moderate): FBI below 12. Fires that start are unlikely to move or threaten community safety. No proactive action required. Seasonal fire laws and Total Fire Ban rules still apply.
MODERATE – Plan and prepare. FBI 12–24. Fires may start and spread but are generally controllable. Most fires can be suppressed with direct attack. Community losses are unlikely. Standard conditions for prescribed burning. Action required: have a plan; stay informed.
HIGH – Be ready to act. FBI 25–49. Fires are likely to be self-sustaining and more complex to control. Combinations of direct, parallel or indirect attack may be needed. Unattended or poorly prepared houses may be at risk. Action required: check your bushfire plan; confirm property is fire-ready; be alert. If you are in a risk area and not fully prepared, consider leaving.
EXTREME – Take action now to protect life and property. FBI 50–99. This is the critical transition point in the system. The FBI threshold of 50 signals erratic fire behaviour and increased likelihood of community loss. Fires burn actively through multiple fuel layers. Spotting transitions from short to medium-distance (up to 2 km). Aerial suppression becomes less effective. Rate of spread in forest: 60–600 m/hr; flame height 2–8 m. Action required: if a fire starts, take immediate action. If you and your property are not fully prepared, go to a safer location well before fire impacts. Reconsider travel through bushfire risk areas.
CATASTROPHIC – For your survival, leave bushfire risk areas. FBI 100+. The most dangerous fire conditions. Fires involve all fuel layers including canopy. Long-distance spotting. High probability of loss of life and property. Homes cannot withstand fires in these conditions. You may not be able to leave once fire is active, and help may not be available. Action required: go to a safer location the night before or early in the morning. Do not wait for a fire to start.
Use the 30/30/30 + L Rule to help monitor conditions
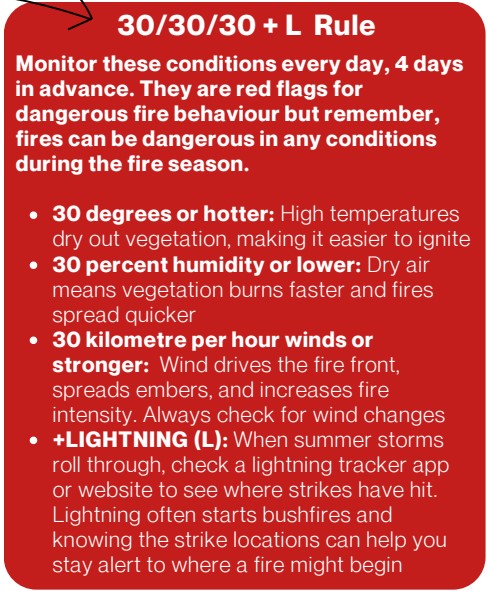
- Use local emergency apps to stay updated. Set up watch zones or alerts for your property and nearby areas, and learn what the icons mean.
- Know the daily Fire Danger Rating, Check your emergency app for the rating in your area. Do this each day, 4 days in advance.
- Share updates with family, neighbours and anyone vulnerable in your community to help build local awareness and keep others informed.
- Make it a habit by checking ratings over breakfast.
- Work on your bushfire plan and practice it!
Source: Protecting your home from Bushfire – FPA
What the Rating System Does and Does Not Tell You
The fire danger rating describes the potential behaviour of a fire IF one starts. It is not a predictor of how likely a fire is to occur. A Moderate rating day can still produce a dangerous fire; a Catastrophic rating day may see no fire at all. The rating tells you how dangerous conditions are, not whether a fire will happen.
The FBI threshold between High and Extreme (FBI 50) is operationally significant. It represents the point at which fire behaviour becomes erratic, suppression difficulty increases substantially, and the probability of community loss rises sharply.
For Brown Hil residents, this transition is the point at which planning and preparation must already be complete, there is no time to begin preparing once conditions reach Extreme.
Significant house loss has occurred at fire danger ratings well below Catastrophic. Dr Kevin Tolhurst stated explicitly in his BRI webinar presentations that residents should not use official fire danger declarations as their only trigger: “You can have life-threatening situations outside those conditions.” The fire danger rating is a necessary input to planning, it is not a sufficient substitute for it.
The Rating System and the Research Evidence
The Leonard/Blanchi post-fire survey research (Canberra 2003, Sydney 1994, Ash Wednesday 1983) was conducted primarily under conditions equivalent to the Extreme and Catastrophic end of the current rating system. The Canberra 2003 fires had an FFDI of approximately 103, clearly Catastrophic under the current system. Sydney 1994 was approximately FFDI 88 (Extreme-Catastrophic boundary). Ash Wednesday was FFDI 102 (Catastrophic).
This is important context for how the research evidence applies to Brown Hill residents. The findings, ember attack as the dominant ignition mechanism, house-to-house spread, the role of human intervention — all derive from conditions at the most extreme end of the rating scale.
Under High or lower Extreme conditions, the same mechanisms apply but more slowly, giving a prepared resident more time to identify and suppress small ignitions. The obligation to prepare exists across the full rating spectrum, not only for Catastrophic scenarios. As Dr Tolhurst stated directly: “chances are you will be subjected to a bushfire of lower intensity and you need to be prepared for either eventuality.”
Looking at the risk profile for estate houses – Is there anything you can do? YES, by applying Home Ignition Zone guidelines, especially Zone Zero
Now that you have a fair idea of the complexity of the risk situation for estate residents, probably the question upper most in your mind, “Is there anything I can do?” The answer? YES. It is however, not a complete answer. It is not a guarantee. But it is the only scientifically grounded lever that urban-rural fringe estate residents in this specific housing type actually possess, and it is more effective than most people assume. It is preparing your home and property according to the “Home Ignition Zone” guidelines and to ember-proof your home.
Definitions: The Home Ignition Zone is the area immediately surrounding your house, out to about 30 metres, but most critically the first 1.5 metres — where embers land and ignite things. Ember-proofing a home to bushfire embers means making physical changes – before the season – that reduce the ways embers can get into your home and take hold. It is work done in advance, not on the day. REMEMBER: Houses burn from the inside out.
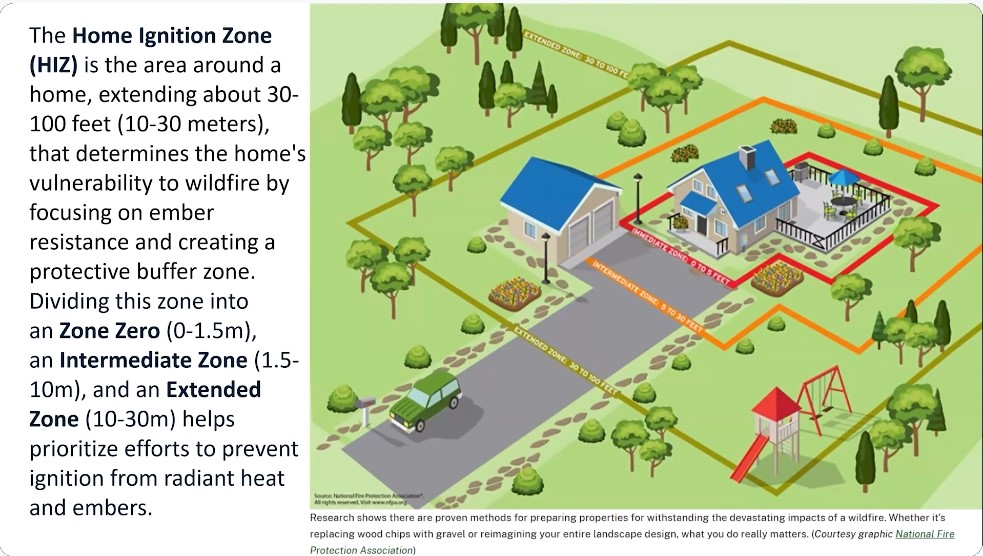
Before you throw your arms in the air to say, “I don’t HAVE a 30m buffer around my house!” For estate houses this is obvious, and the reality of where you live – BUT you do, have a Zone Zero (0 to 1.5m) and an Intermediate Zone (1.5m to 10m) which could be overlapping with your neighbours. It isn’t much but it IS something you can work with.
American fire researcher Jack Cohen of the USDA Fire Sciences Laboratory spent decades studying how houses ignite during wildfires (US term for bushfires) View the video below. His finding, which became the basis of the Home Ignition Zone concept, is both alarming and empowering: houses do not primarily ignite from the radiant heat of an approaching fire front. They ignite from embers — burning fragments of bark, leaf and twig carried ahead of the fire, sometimes kilometres ahead — landing in and around the structure itself…
This means the decisive zone is not the distant bushland. It is the immediate area surrounding the house. And that zone is almost entirely within the resident’s control.
This is what Jack says: “Thus, community wildfire risk is not directly determined by wildfire intensity and its location related to wildland. Burning embers, initially from the wildfire and then from burning structures within the community are a principal contributor to community fire spread. Thus, not having a flammable wood roof, removing flammable tree debris from the roof, in rain gutters, on decks, assuring nothing burns (flaming or smoldering) within 5 feet (1.5 m) of flammable walls and attachments, and vents covered with 1/8 inch (2 mm) mesh screen can significantly increase home ignition resistance… The inevitability of uncontrolled extreme wildfires spreading to communities does not mean WU fire disasters are inevitable. We can effectively prevent WU fire disasters by reducing home ignitability and collectively, the community.”
Dr Justin Leonard at CSIRO reached the same conclusion through a different route: systematic post-fire surveys of more than 1,800 houses across three major Australian fires, including Canberra 2003, Sydney 1994 and Ash Wednesday 1983. His finding is precise: in the Canberra 2003 fires, no house in the surveyed area showed evidence of direct flame contact from the fire front itself. Over 90% of losses were caused by ember attack, alone or in combination with radiant heat from adjacent burning structures. The fire front was not what destroyed those houses. The fire front passed. Houses burned down hours later from small ignitions that were not caught.
This is what Justin says: “Invariably, the greatest risk by fire is the ember attack and the surface fire that ignites the houses. That’s the predominant way houses are ignited.” “… Zero to 1.5 metres. It really is the most critical. I can’t overemphasise that as a guiding principle. If you haven’t got your house and its immediate surroundings in complete order, all the rest of the work in the broader landscape is dramatically diminished in relevance and usefulness”.
Home Ignition Zone (HIZ) – The Core Concept
The following video and others sourced from Fire Safe Marin, are used throughout these webpages, as there is no equivalent in the Australian context for urban-rural fringe estate housing. The substance of the videos offers many similarities to the Brown Hill context. However, there are a number of US terms that are different to what we are used to. In the US residents are under mandatory evacuation orders. In Victoria it is voluntary evacuation – no authority can make you leave your home in a bushfire event.
The main differences being: wildfire = bushfire; WUI – wildfire urban interface = bushfire urban-rural fringe/interface; firebrands = embers; lengths in the US are in feet – easy conversion for zones: Zone Zero: 0 to 5 feet = 0 to 1.5m; Intermediate Zone 1: 5 feet to 30 feet – 1.5m to 10m; Extended Zone 2: 30 feet to 100 feet = 10m to 30 m. At times they may use different names for the zones but the distances are the same.
Other building terms e.g. “Class A roof” has the highest fire-resistance rating in US = Aus BAL rated roofing; “siding” in US = “cladding”, any material attached to the exterior of walls. Any codes or regulations mentioned are not applicable to Australia.
The Home Ignition Zone concept, was created by Jack Cohen at the USDA Fire Sciences Laboratory, in this video he explains the science behind how this concept was developed.
What this means to Estate residents of Brown Hill
For Australian urban fringe estate housing, the relevant zone is not the 30–50 metre bushland interface but the zero to 1.5 metre immediate property zone.This zone is entirely within the resident’s control, requires no vegetation permits or council approvals, can be substantially improved with low cost and moderate effort. It is the primary determinant of whether a house survives ember attack.
The urban-rural fringe compromise: where zones overlap
The Home Ignition Zone research sets out an ideal: a clear Zone Zero immediately against your house, managed zones extending to 30 metres. On a northside estate block, you can reach your neighbour’s fence before you reach Zone One. This is not a failure of preparation. It is the structural reality of estate housing — and it changes what “lowering your risk” means. Your Zone Zero is yours to control, and it is the highest-value action available to you. But your full ember risk extends beyond your boundary — into zones that belong to your neighbours, just as theirs extend into yours. The bottom diagram is northside equivalent. Every house’s ignition zone overlaps with the houses around it.
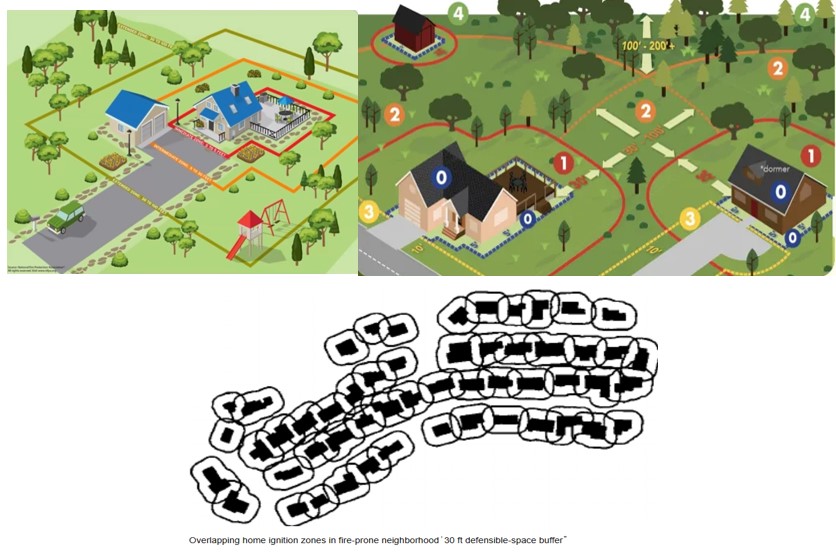
In a potential house-to-house fire scenario with a 3–6 metre separation between houses – one burning house directly threatens the next. Your Zone Zero preparation matters most to your neighbours. Theirs matters most to you. This is not an individual problem with an individual solution. It is a street-level problem that only has a street-level answer.
Jack Cohen, who developed the Home Ignition Zone concept, says it this way:
“A fire-adapted community is what you get when you have collectively ignition-resistant houses. And if it’s of higher density, such that you’ve got Home Ignition Zones overlapping, then you’ve got ignition-resistant Home Ignition Zones, house after house.”
Maintain your Zone Zero and what you can in Zone 1, then talk to your neighbours. Whether any of you are there on the day or not, a street where every household has done its Zone Zero is a street that gives itself the best chance of not becoming a town fire.
But where is this research put into practice?
Fire Safe Marin, California – Firewise Communities
 The research is compelling. The logical cascade is sound. But for a resident of a northside estate who has never experienced a bushfire and has no fire frame of reference, the question underneath all of it is a simpler one: “Has anyone actually done this? And did it make a difference?”
The answer is yes – and a well established example comes from Marin County, California, a community whose situation maps directly onto Brown Hill northside in ways that matter.
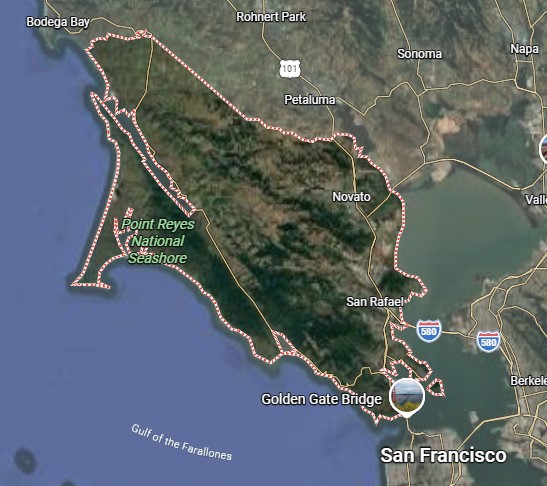
Marin County sits north of San Francisco across from the golden Gate Bridge. Marin County’s wildland-urban interface neighbourhoods are small, densely packed subdivisions adjacent to steep, fire-prone hillsides.
They operate under mandatory evacuation orders – the official advice is to leave. And yet the county has built the largest county-wide Firewise community program in the United States, currently representing more than 60,000 residents across 90+ recognised sites. The program is coordinated by Fire Safe Marin, a non-profit established in 1992, and is built entirely on the HIZ / Zone Zero / house hardening framework.
The logic driving it is explicit: leave early, yes, and harden (ember-proof) your home before you go, because that is the only thing that gives it a chance of still being there when you return. This is precisely the FireAware Network’s cornerstone argument, arrived at independently. Marin Co. is operating at scale, under mandatory evacuation conditions.
What Fire Safe Marin has done is convert the research into visible, street-level practice.
Their program includes property inspections with written reports, fire-smart landscaping guides, community workshops, school programmes, a demonstration garden at a local fire station showing Zone Zero in action, and an annual festival attended by over 2,000 people. Crucially, it frames Zone Zero not as a council regulation to comply with but as a neighbourhood-scale decision: each property doing its Zone Zero work protects the properties around it.
There is NO equivalent in Australia: The gap between Brown Hill and Marin County is not the research, the logic, or the resident capacity to act. The gap is simply that no equivalent program exists here. The Marin example answers northside resident’s question directly: “Has anyone actually done this?” Real communities, in real subdivisions, under mandatory evacuation orders, have taken the HIZ framework from research and are putting it into practice. The science is not theoretical. It is being tested at scale, right now, by communities whose situation closely resembles northside.
Let the following videos speak for themselves
What is Defensible Space? Get to know your Zone Zero
The Camp Fire in California in 2018 provides the starkest available evidence for what building standards, and their absence, actually mean in practice:
California wildfire experience (catastrophic event): In 2018, the towns of Paradise and Concow, California, experienced the state’s deadliest and most destructive wildfire to date. The Camp Fire was blamed for at least 85 deaths; the loss of 12,450 homes destroyed and damages estimated at $15 million. Both towns were largely destroyed.
As town officials surveyed the damage and looked toward the future, they found one factor correlated with homes that survived the fire: newer building codes. Homes built after the implementation of modern fire-mitigation codes fared much better than those built prior to those changes. Of the 350 homes in the former category, 51% survived, according to a 2019 analysis of fire and property records by McClatchy journalists. Of the 12,100 homes built prior to the new codes, only 18% were left standing.
Fire-resistant building codes address not just the materials and methods of construction but surrounding “defense zones” as well. For instance, California’s fire-safe building code, known as Chapter 7A, covers roofing materials, windows, eaves, vents, decks and more. It also requires defensible space in the 100 feet surrounding a home as a buffer between a building and grass, trees, shrubs and other landscaping. When combined with home hardening, these tactics greatly increase the odds of a structure surviving a wildfire. Zone Zero at a glance
Where community action meets the insurance industry
Firewise USA / Fire Safe Marin and IBHS aren’t separate stories, they’re the same one from two directions. Firewise gives residents a reason to act; IBHS gives insurers a reason to reward it. Each depends on the other holding up, and together they’re what’s kept Marin County insurable at all.”
The US insurance industry is actively responding to the increasing pressure of the cost of extreme events facing the industry. Their primary motivation is financial survival of the insurance market itself. In California, between September 2024 and December 2025, home owner enrolment in the state’s insurer-of-last-resort surged as 43% of private insurers withdrew from wildfire-prone areas following the LA fires. The industry is facing an existential crisis in high-risk zones. For home owners the reality is that coverage in high-risk areas is becoming harder to obtain and more expensive to maintain, regardless of what they currently hold.
For decades, insurers priced wildfire risk almost entirely on location, where your house sat in relation to bush determined your premium. IBHS (Insurance Institute for Business & Home Safety) research has shifted that foundation: what your house is made of, and what surrounds it in the first 1.5 metres, is now understood to be the primary determinant of whether it ignites at all. IBHS is the research arm of the US property and casualty insurance industry, not a government body, not an advocacy organisation. It is funded by insurers to produce the science that underwrites their pricing and standards decisions. When IBHS says Zone Zero is the critical lever, the industry that pays claims is now saying it.
IBHS Wildfire Prepared Program — progression timeline:
- June 2022 — Wildfire Prepared Home launches. First-ever designation distinguishing homes mitigated against wildfire. Focus: ember resistance at the structure level. Two tiers: Essential (ember attack) and Enhanced (radiant heat and direct flame).
- June 2025 — Updated Wildfire Prepared Home standard released. Zone Zero (0–1.5m non-combustible zone) formally embedded as a core requirement.
- August 2025 — IBHS research confirms ember-resistant buffer around a home cuts ignition risk in half.
- March 2026 — IBHS and APCIA release Community Wildfire Risk Reduction Program Framework toolkit. Moves from individual home to neighbourhood scale. Goal stated explicitly: from ad hoc mitigation to systematic, measurable, replicable community programs. Includes home assessor training, implementation templates, and communications strategies.
- April 2026 — Wildfire Prepared program expands to 14 US states.
- June 2026 — Wildfire Prepared Neighborhood and Wildfire Prepared Multifamily standards added. Formal recognition that individual home mitigation is insufficient at close separations — structure-to-structure spread requires street-level collective action. Direct quote from IBHS: “The decisions you make to protect your home can directly affect the homes around you during a wildfire.”
The industry that underwrites policy is now telling homeowners that HIZ is the path to remaining insurable at all.
But how does this relate to Brown Hill?
The Australian insurance industry is under the same structural pressure as the US but has arrived by a different route but the destination is identical. Weather-related insured losses exceeded $7 billion in 2022 alone. Home insurance premiums rose an average of 7.2% annually between 2010 and 2025. APRA’s March 2026 Insurance Climate Vulnerability Assessment projected that one in seven Australian houses are currently uninsured, rising to potentially one in four by 2050. The Australia Institute estimated 1.4 million homes are already uninsured or underinsured. The drivers are floods, cyclones and bushfires — the industry is not distinguishing between them, it is repricing all climate risk simultaneously.
The bushfire-specific response is now beginning. Half the Australian home insurance market prices bushfire mitigation following the launch of the Resilience Building Council certification app. APRA has named household and community-level resilience measures as a lever capable of narrowing the protection gap. ICA chief executive Andrew Hall described the certification approach as “an Australian innovation now being studied globally as proof that household-level risk reduction can help improve insurance affordability.”
Australia is five to eight years behind the US in formally linking mitigation to pricing, but the trajectory is the same. The science IBHS built its program on is identical to the science Leonard and Tolhurst established for estates like Brown Hill. The industry conclusion is coming. The research is already here.
Finding how to apply Home Ignition Zone with site constraints
This was not easy to find but the following may be of assistance. The following slides are taken from a Federal Emergency Management Agency (FEMA) presentation: Designing for Wildfires: Module 5, Defensible Space: FEMA’s Building Science Disaster Support Program,
The problem: Property owners have less guidance on how best to augment their property to account for hazards that are not within their control – including limited setbacks, adjacent to unmanaged vegetation on neighbouring properties, vacant lots, and proximity to other buildings.
Most existing defensible space codes and guidance assume a property owner has 30 metres (approximately 100 feet) of side yard around their building. In suburban and urban fringe land uses, 30m of defensible space is typically not available.
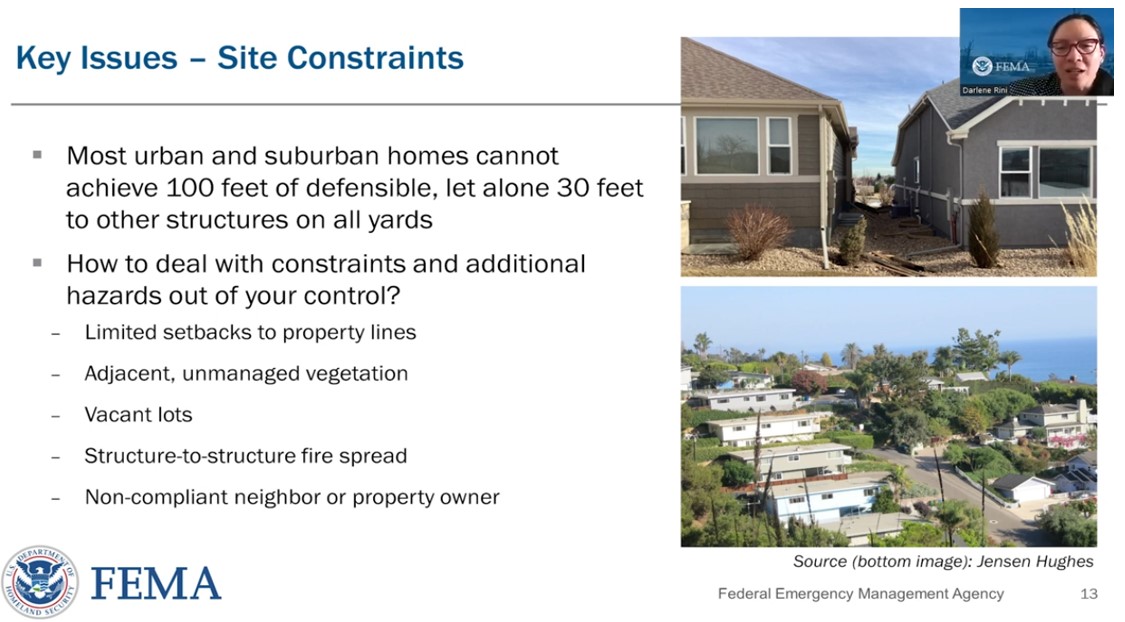
The response: Where individual properties cannot achieve the full fuel modification zone requirements the concept of communal defensible space is a practical way in which a group of structures can achieve defensible space collectively.
Landscaping and other defensible space measures – particularly for Zones Zero, One and Two – can be shared across property lines, and the design of the vegetation and landscaping coordinated across all parcels to protect structures collectively.
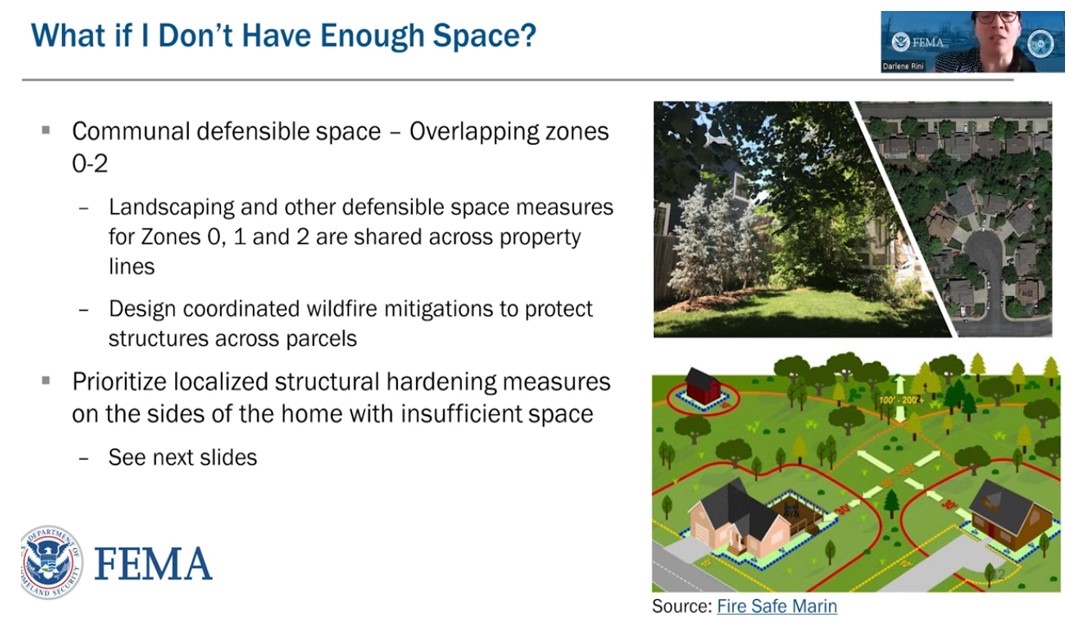
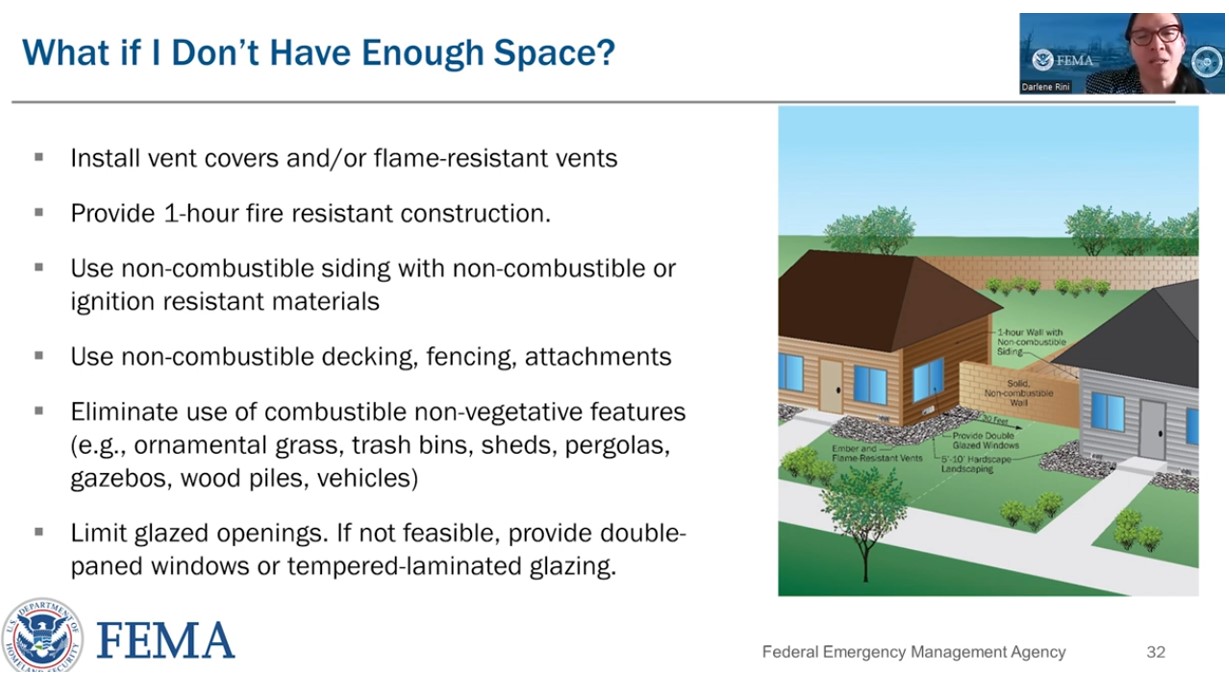
Enhance structural hardening where space is insufficient: Where communal defensible space is applied, property owners that are in close proximity to adjacent neighbours should also think about increasing structural hardening measures on the face of their property that directly abuts adjacent neighbours. These additional measures can further help increase wildfire resiliency of buildings and properties with various site constraints.
- Vent covers: Installing vent covers and other flame-resistant vent products on the face of the building that closely fronts another property or building.
- Exterior wall fire resistance: Increasing the construction of the exterior facade or wall assembly to be 1-hour fire resistant, using non-combustible siding with non-combustible or ignition-resistant materials and insulation.
- Using non-combustible decking, fencing, and other types of non-structural attachments.
- Eliminate combustible non-vegetative features: Eliminating the use of combustible non-vegetative features such as ornamental grass, sheds, pergolas, and other types of man-made fuels in this shared, close-proximity yard space.
- Limit or harden glazed openings: Limiting glazed openings, and if not feasible, providing double-pane windows, tempered or laminate glazing, or other types of non-combustible shutters.
The presenter is Darlene Rini who is a Director in the Research, Development, Testing & Evaluation Division of the Jensen & Hughes firm, in Southern California. She also leads the firm’s Wildfire Risk Mitigation Global Service Line. Her 20+ years of experience have earned her international recognition as an expert in structural fire engineering, code consulting, wildfire resiliency, and disaster risk management.
The buying time scenario
None of these actions eliminates risk. This is important to say plainly. What they do is change the probability and timing of ignition. A house that is ember-proofed to the extent possible gives embers more to defeat before ignition escalates. That is time – time for a resident who cannot leave to identify and suppress a small ignition before it becomes uncontrollable. Time for a fire event to pass. Time for a house to still be standing when residents return.
Justin Leonard says: “The combination of very carefully preparing a house for a fire and then actively defending it is obviously a lot more effective than simply trying to actively defend and overcome all of those shortcomings, many of which ideally should have been addressed by passive fixes.”
The Collective Argument
There is one further dimension to this that the research supports and that individual preparation guidance typically misses.
When one house ignites in an estate, it becomes a radiant heat source and ember generator for adjacent properties. At typical northside estate separations of three to six metres, a single burning house can directly ignite the next. Leonard’s surveys documented approximately 35 Duffy houses (16% of those surveyed) were lost to house-to-house transfer rather than direct fire front impact. More broadly, the report found that without the suppression activity that occurred in the hours after the fire front passed, total house loss in the surveyed area would likely have approached 100%, compared to the actual 47%.
Every structure that delays its own full involvement reduces the sustained heat energy delivered to the adjacent structure – changing probability, changing timing, and cumulatively affecting how far and how fast a cascade progresses through an estate.
For existing dense communities, where separation cannot be changed, the response is to “maximise hardening and minimise potential exposures by eliminating connective fuels, including outbuildings such as sheds.” No single measure is sufficient. The effect is collective and cumulative. This is consistent with the Zone Zero hierarchy and with Leonard’s independent findings from post-fire survey research. It is now also supported by controlled experimental evidence at the specific separation distances that characterise northside estate housing. Access: IBHS experimental research paper
The individual question – will my house survive? – is the wrong frame for close-packed estate housing. The question the experimental evidence supports is: What slows the cascade across a group of houses? and the answer is the collective of individual Zone Zero decisions. A street that buys time.
Every household that ember-proofs its own property reduces the ignition risk not only for itself but for its neighbours. A prepared empty house, one left by residents who evacuated early, is not a threat to the neighbours who could not leave. An unprepared empty house is. This is a collective benefit achieved without requiring collective action, community coordination, or estate-level cohesion that does not yet exist.
The cornerstone: Ember-proofing your home is not preparation for a decision. It is preparation regardless of what happens. Whether you leave early or find yourself unable to leave, the work you do in the weeks before is what determines the outcome.
Do you know that Brown Hill is in a Bushfire Prone Area?
Understanding your property’s formal fire risk classification is the next step, it tells you what standards your house was built to, and just as importantly, what those standards don’t cover. Not sure if you are in a Bushfire Prone area? refer to this FireAware page for maps and more details
ALL of Brown Hill’s northside estates sit within a designated Bushfire Prone Area, a formal planning classification that triggers minimum construction standards for houses being built there. Those standards are expressed as a Bushfire Attack Level (BAL) rating, and are assigned to properties at the time they are built. A higher BAL means stricter construction requirements. A significant area of Brown Hill southside is also within a Bushfire Prone Area.
Bush fire prone areas are identified as subject to, or likely to be subject to, bushfire attack. It is recognised by the presence of, and proximity to, bushfire prone vegetation, and includes both the area containing the bushfire prone vegetation and a 100m buffer zone immediately surrounding it.
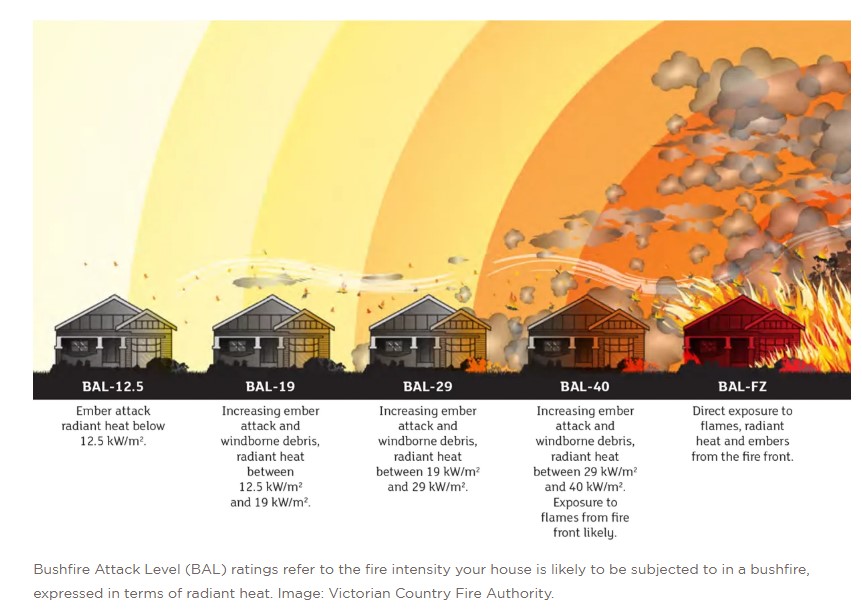
A Bushfire Attack Level (BAL) is a means of measuring the severity of a building’s potential exposure to ember attack, radiant heat and direct flame contact. It’s measured in increments of radiant heat (expressed in kilowatts/m2). A BAL is the basis for establishing the requirements for construction (under the Australian Standard AS 3959-2009 Construction of Buildings in Bushfire Prone Areas), to improve protection of building elements from bushfire attack.
Basically, BAL rating requirements aim to ember-proof your house, at the time of construction, for a bushfire front event. It provides a list of housing modifications that is useful for any resident wishing to understand what ember-proofing means. It is important for residents to do their own research to ensure their particular circumstances are covered in any ember-proofing actions undertaken.
Do you know if your house has a BAL rating?
To check if your house is located within a BPA and / or a Bushfire Management Overlay area (BMO), which may require a BAL rating assessment, refer to the Brown Hill maps for a quick reference to see if you are.
If you would like to find what your BAL rating may be, you can:
- Search your property: to see if it has a Bushfire Management Overlay (BMO) status through the Victorian property system –
- vic.gov.au. Search your address and look for planning overlays. If you have a BMO and your house was built after September 2011 it should have a BAL rating.
- Check your Section 32 / vendor statement: this document, provided at time of purchase, should record any planning overlays including BMO and BAL.
- If you can’t locate it: contact City of Ballarat planning department. They should be able to confirm overlays on your title and any BAL rating.
Two things are worth understanding about your BAL rating.
First, it was a snapshot – assessed at the time of construction against the vegetation present then. Garden growth and landscape changes since may have altered your actual exposure. Such housing would also require regular maintenance to maintain its rating as the house ages and elements deteriorate. BAL compliance is a snapshot at time of build. Mesh screens corrode. Seals shrink. Debris accumulates in tracks. A window compliant in 2015 may not be performing to spec a decade later. Maintenance of BAL features is the resident’s responsibility — the standard requires them at build but does not enforce ongoing upkeep.
“Your home was built to a standard that takes ember attack seriously. That is a genuine advantage. Your job is to keep it that way.”
Second, and more importantly: BAL ratings address radiant heat from a fire front in vegetation. It says nothing about house-to-house ignition. Your BAL rating is a starting point, not a guarantee. To find your property’s overlay status, search at land.vic.gov.au/property-and-parcel-search.
As Justin Leonard (CSIRO) states directly: even a fully BAL-compliant house achieves only around an 80% survival rate under the conditions it was designed for, and at Catastrophic conditions, regarding building standards, “all bets are off” .
You’ve now covered the understanding side of preparation. For the practical, on-the-ground actions: assessing your property, ember-proofing zone by zone, and what to do when a high fire danger day arrives – continue to Be Prepared (Part 2).
Disclaimer: The information on this page is drawn from publicly available fire science research, expert assessments, and official guidance, and is provided in good faith to help residents understand their situation and make their own informed decisions. It is not official advice from CFA or any emergency service. Every property and household is different, residents should assess their own circumstances before acting.
AFAC (Australasian Fire and Emergency Services Authorities Council). Bushfires and Community Safety Position (2019, Version 6) is a policy document for fire and emergency service agencies. Quoted here as evidence of the official evidence base underpinning this information. This document (2019, Version 6.0) was scheduled for review April 2024; no updated version located at time of web page publication.
For live emergency information: VicEmergency app, ABC Ballarat 107.9FM, or 1800 226 226. In an emergency, call 000.
Sources: Ember-proofing & Zone Zero page Part 1
- Dr Kevin Tolhurst AM — Associate Professor, Fire Ecology and Management, University of Melbourne (deceased October 2023). Brown Hill risk assessment video (2017); BRI Webinar 4, Triggers for Action (2021); BRI Webinar 5, Make Better Decisions About Bushfire Risk in Our Changing Climate (2020) — bushfireresilience.org.au
- Jack Cohen — USDA Fire Sciences Laboratory, Missoula. Home Ignition Zone concept (video, USDA). Cohen, J.D. (2000), Preventing disaster: home ignitability in the wildland-urban interface, Journal of Forestry. Cohen, J.D. and Leonard, J.E. (2025), Hardening Your Home from Bushfire, BRI Webinar 1 — bushfireresilience.org.au
- Dr Justin Leonard, CSIRO — Post-fire surveys of 1,800+ houses (Canberra 2003, Sydney 1994, Ash Wednesday 1983). BRI Webinar series, including BRI Webinar 1 (2025) — bushfireresilience.org.au
- Blanchi, R. and Leonard, J.E. (2005) — Investigation of Bushfire Attack Mechanisms Resulting in House Loss in the ACT Bushfire 2003. CSIRO/Bushfire CRC. Prepared for the ACT Coroner’s Inquiry.
- Dr Rob Gordon OAM — Psychologist and trauma expert. Emotional Preparedness as Part of Bushfire Preparedness (Emergency Recovery Victoria, Dec 2020) — youtube.com/watch?v=H6lQRqvFbSw. Source for hydration/dehydration guidance.
- Joan Webster OAM — Essential Bushfire Safety Tips (3rd edition, 2021), Melliodora Publishing.
- CSIRO — Best Practice Guide (fire triangle) — research.csiro.au/bushfire/
- ACT Bushfire Council — firefighting principle (direct water at fuel, not flame)
- Bureau of Meteorology — Fire Danger Ratings, FBI Index — bom.gov.au/vic/forecasts/fire-danger-ratings.shtml
- FPA Australia (2025) — Protecting Your Home From Bushfire (30/30/30+L Rule source) — fpaa.com.au
- Fire Safe Marin — firesafemarin.org; Firewise USA / NFPA — nfpa.org
- Fire Safe Santa Barbara County — An Introduction to Firewise USA (video)
- McClatchy / Denver Post (2019) — Camp Fire building-code survival analysis — denverpost.com
- Cal Fire — Zone Zero at a Glance; defensible space standards — fire.ca.gov/dspace
- IBHS (Insurance Institute for Business & Home Safety) — Wildfire Prepared Home program timeline (2022–2026); experimental research paper on building-to-building spread — ibhs.org
- APRA — Insurance Climate Vulnerability Assessment (March 2026)
- The Australia Institute — underinsurance estimates
- ICA (Insurance Council of Australia) — Andrew Hall, Resilience Building Council certification commentary
- FEMA Building Science Disaster Support Program — Designing for Wildfires: Module 5, Defensible Space, presented by Darlene Rini (Jensen & Hughes) — youtube.com/watch?v=8BmTDgl6RKw
- AS 3959-2009 — Construction of Buildings in Bushfire Prone Areas (BAL rating standard)
- Victorian property/planning system — land.vic.gov.au/property-and-parcel-search
- AFAC — Bushfires and Community Safety Position (2019, Version 6)